Tuesday, November 26, 2019

No Knead Cheese Bread

No Knead Cheese Bread held by hand.

First of all, how good is warm, crusty, soup-dunkable bread.

Secondly, take that and times-it by 100 because how good is warm, crusty, soup-dunkable CHEESE bread. Remember this life-changing No Knead Bread? Let’s take it next-level.

We’re talking a beautiful loaf of cheese bread that you MADE, you boss baker you! With your own two hands. Your own two clean hands that didn’t need to do anything fancy except hold a bowl and a wooden spoon.

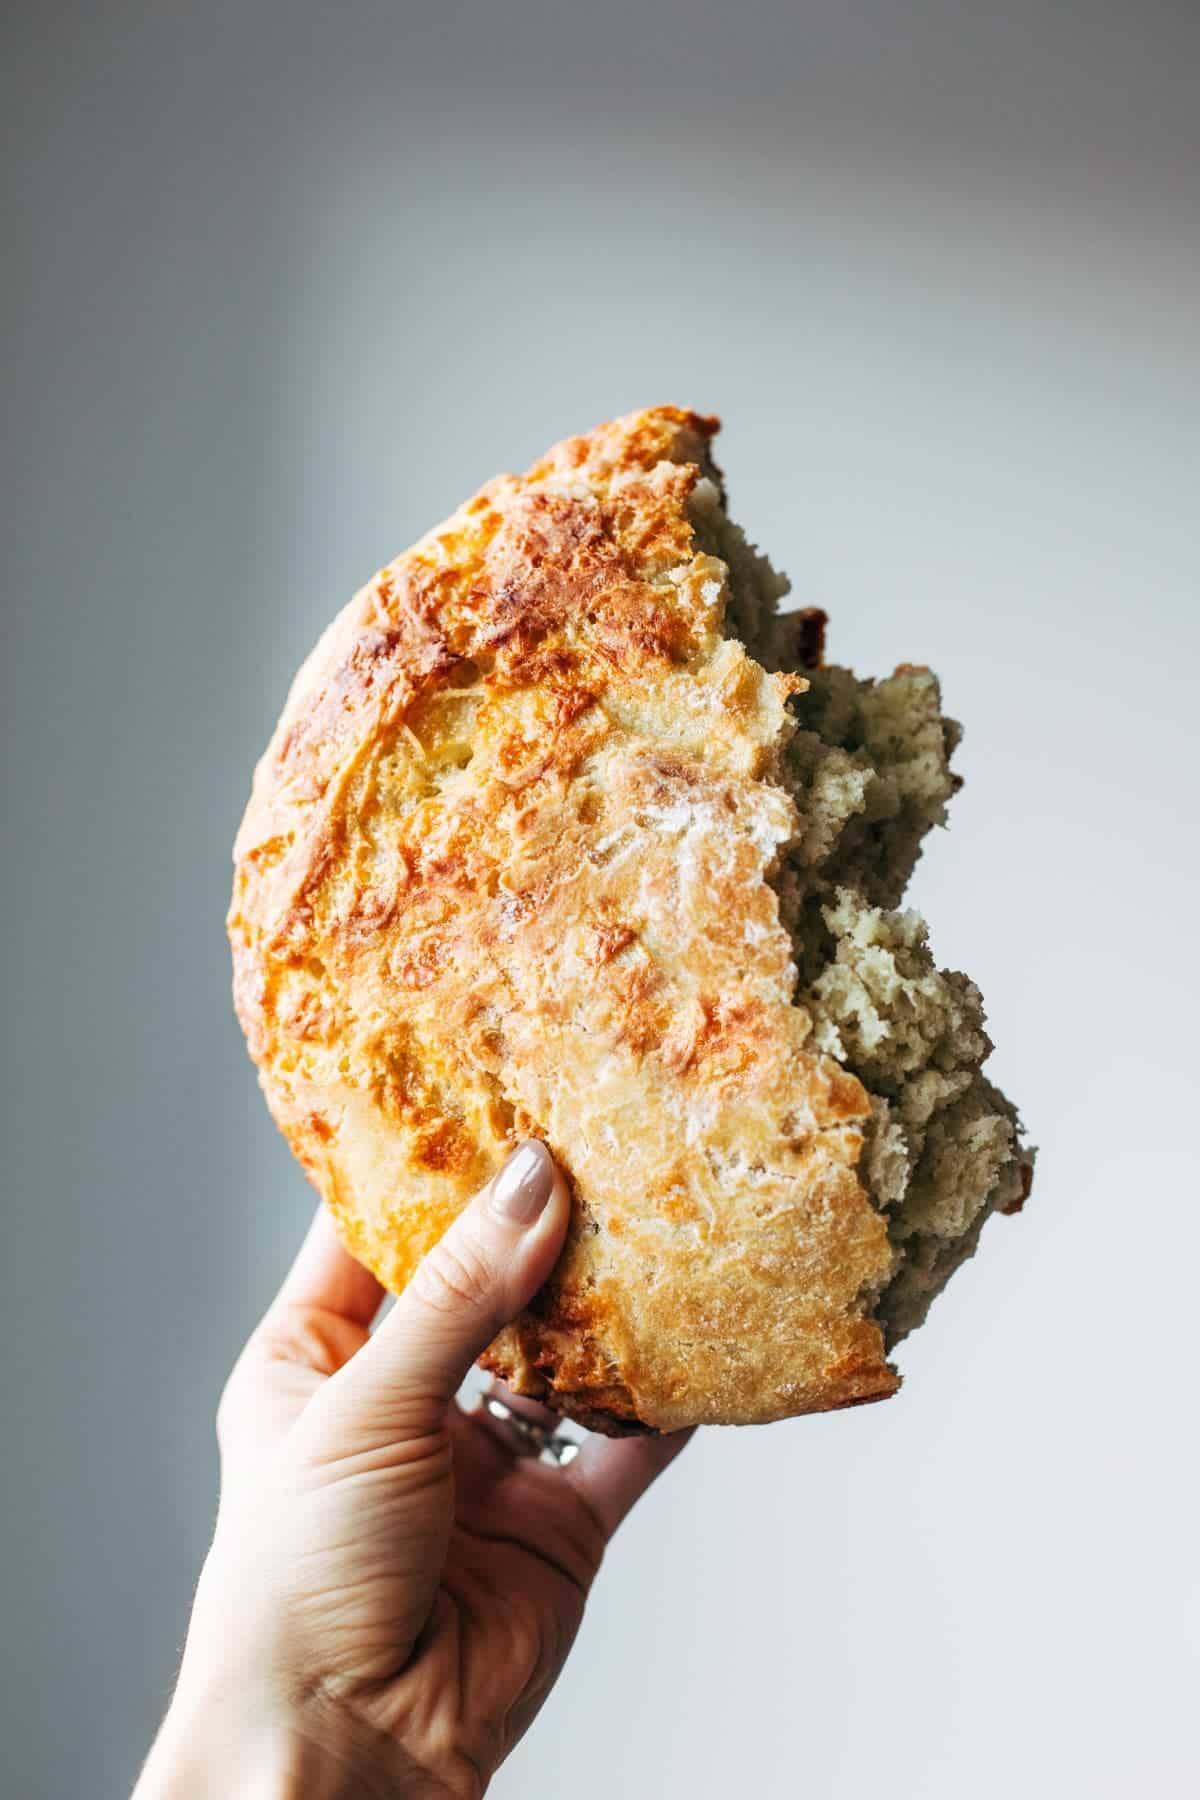
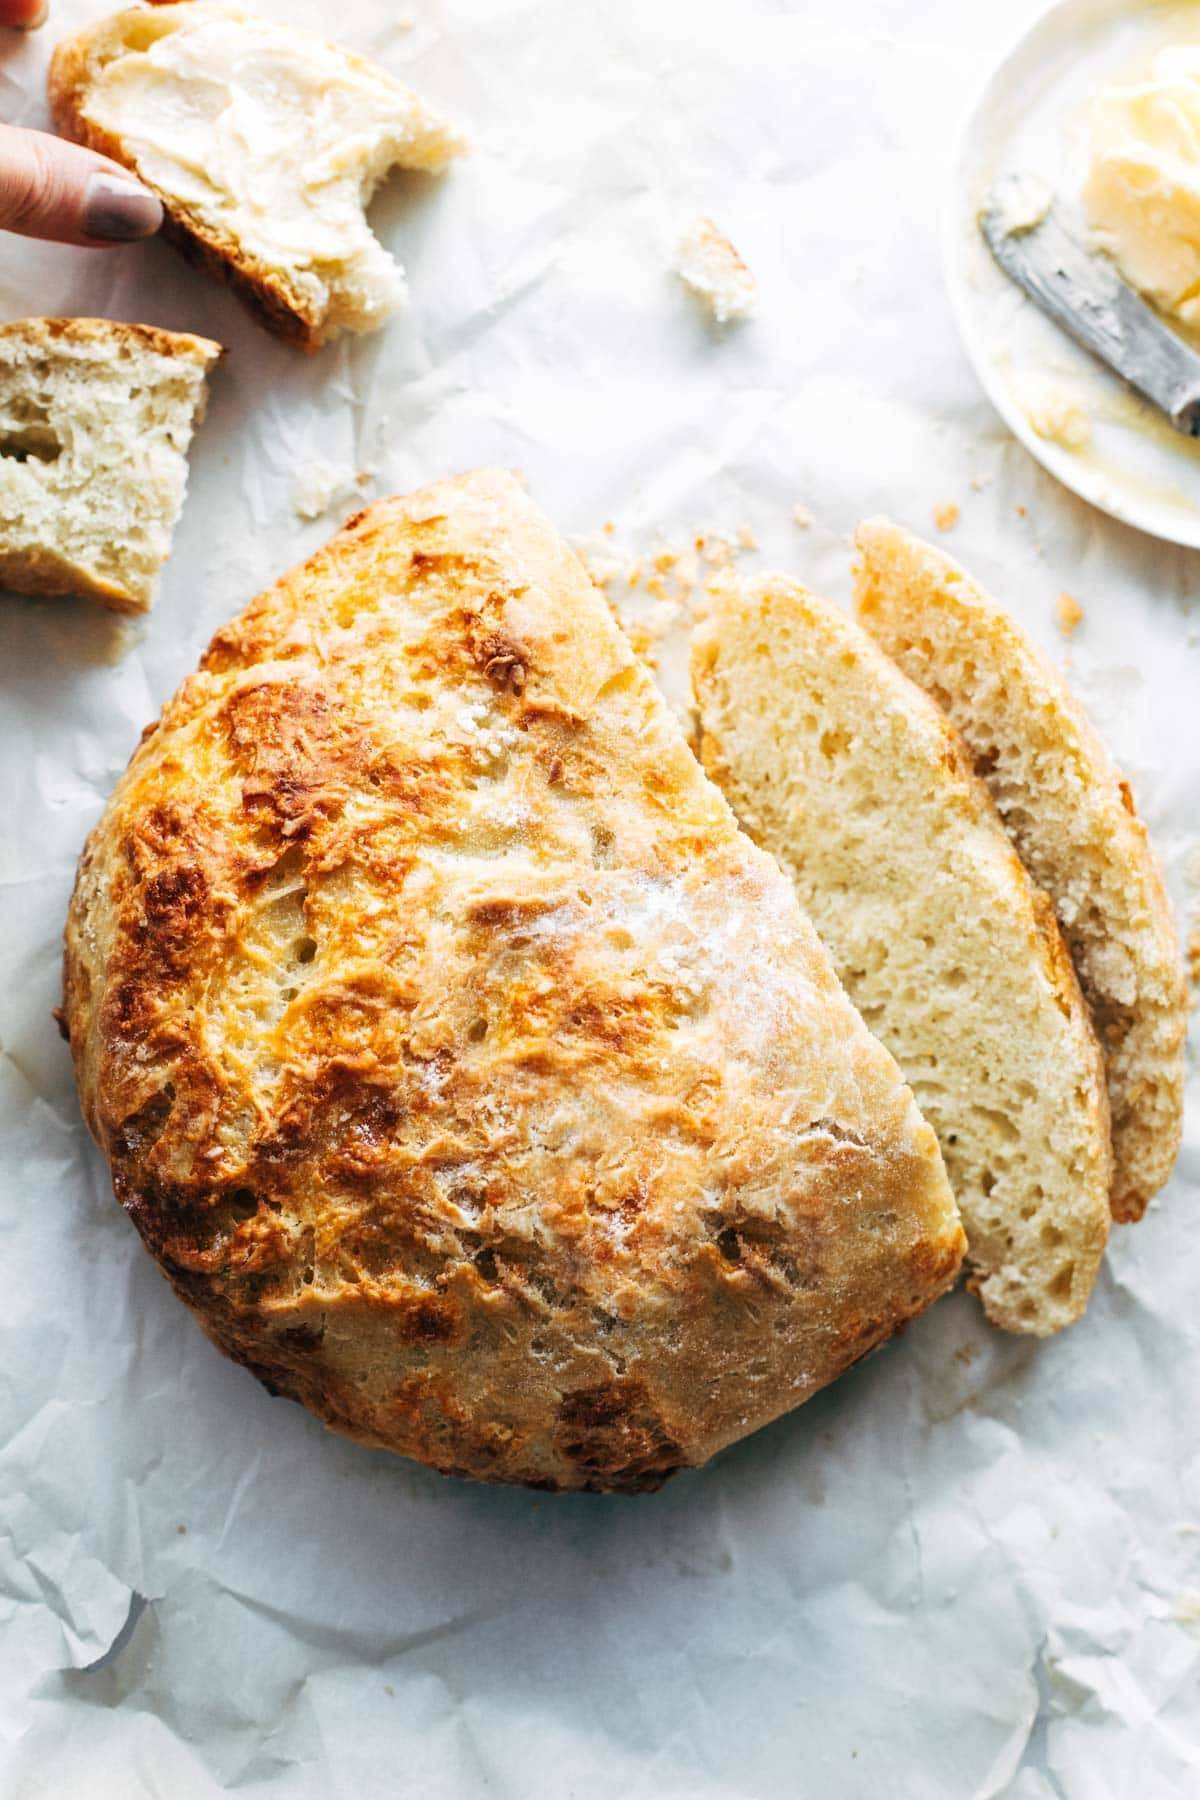
This cheese bread is soup’s best friend. It is crusty and golden on the outside – enough to really crackle when you tear into it – but the inside is pillowy and soft with an appropriate amount of density from that melted cheese holding it all down. Please put down all the knives and just pull it apart with your hands in hot, steaming chunks. It’s a rustic, hands-on bread and it doesn’t need you to pretend.

I don’t make homemade bread, you say? A) I understand you because I am you, and B) This one is different. You can make this bread.

Here’s How to Make No Knead Cheese Bread:

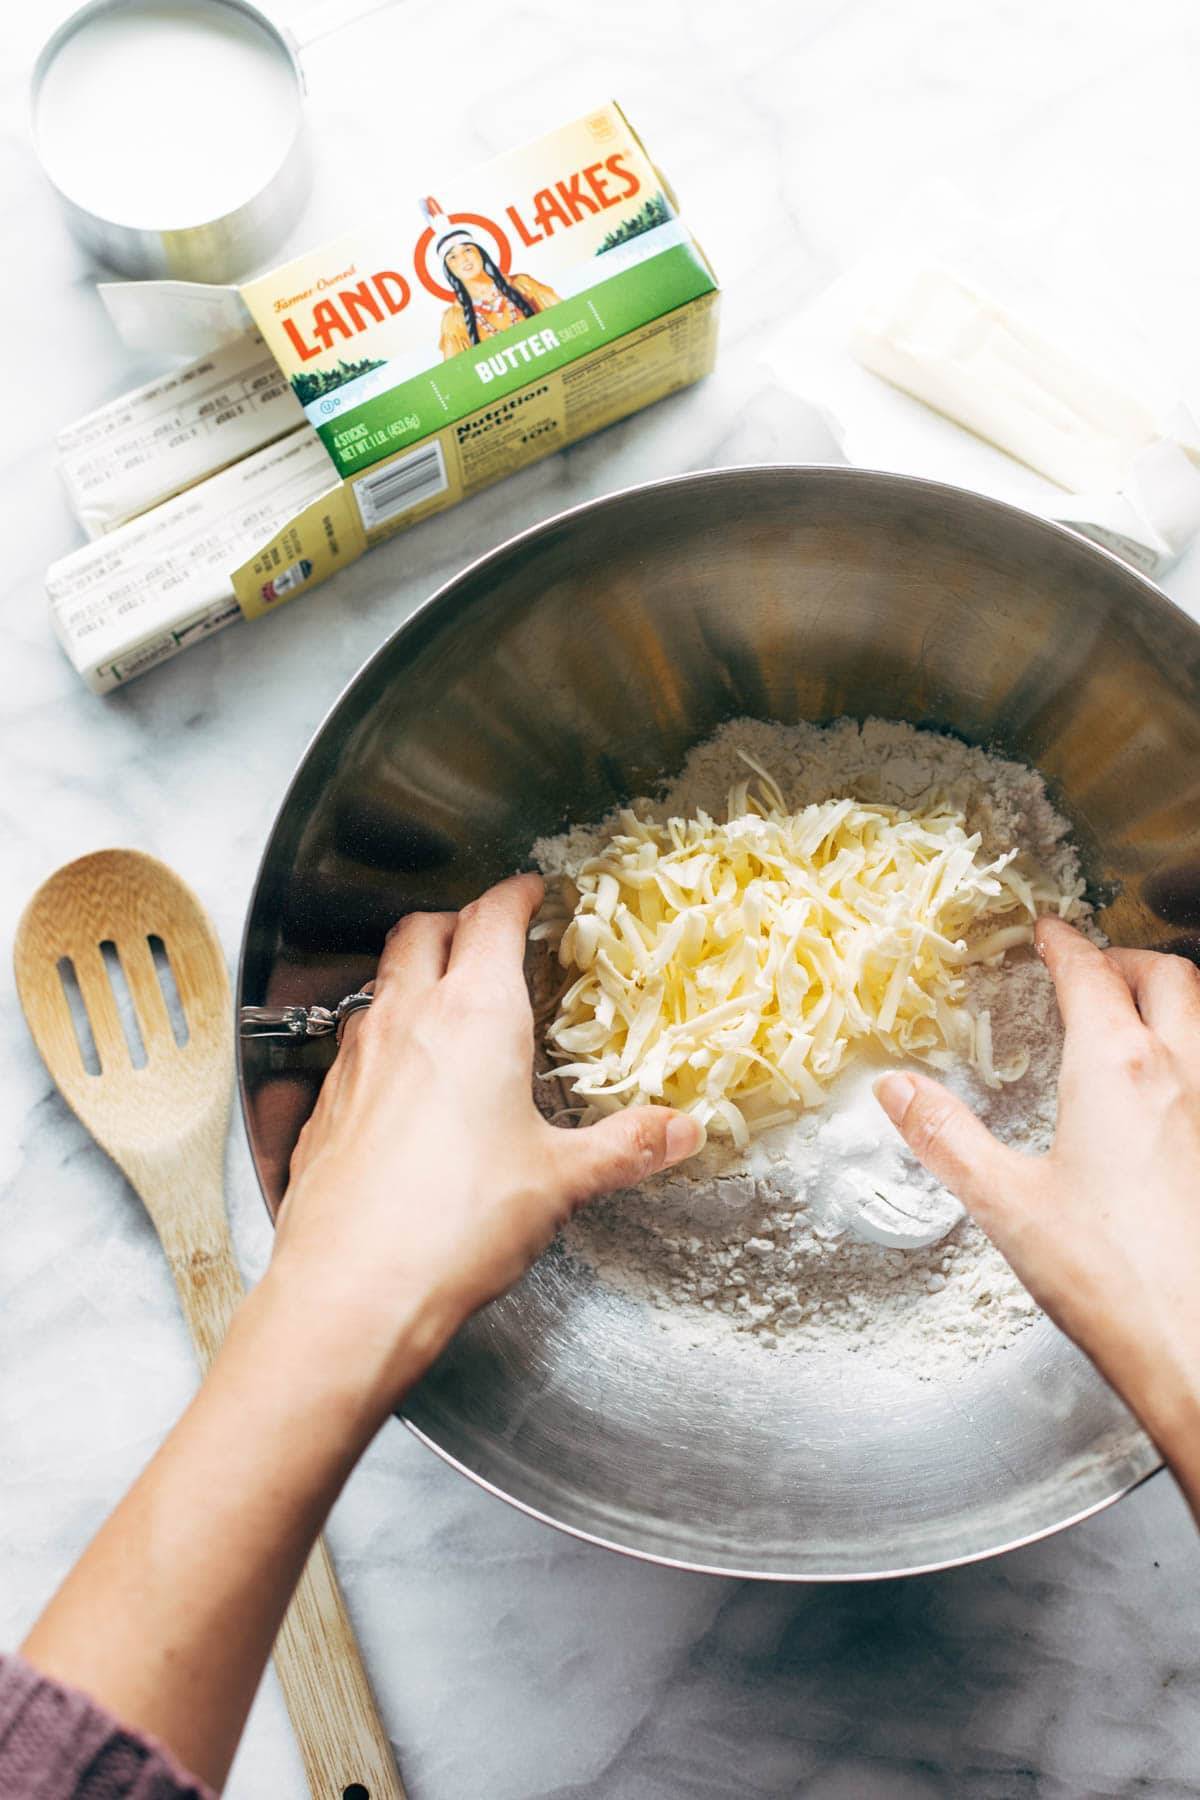
Step 1: Stir up a dough – with a wooden spoon is perfect. Work a little cheese in there. Cover and let it rest.

Step 2: Now it’s puffy and loose, so just roll it out and onto a piece of parchment. Bake it in a Dutch Oven with a tight-fitting lid, and finish without the lid to get it browned.

Step 3: Tear into it. Dunk it. Butter it. Butter and salt it. Dunk it again. Impress your friends and family because you are a now a person who makes homemade cheese bread.

Grab your soup bowls. Put on your sweaters.

No Knead Cheese Bread season is upon us!

No Knead Cheese Bread with slices.

No Knead Cheese Bread


  • Author: Lindsay
  • Prep Time: 12 hours
  • Cook Time: 30 minutes
  • Total Time: 12 hours 30 minutes
  • Yield: 6 servings

Ingredients

  • 3 cups all purpose flour
  • 1 1/2 teaspoons salt
  • 1/2 teaspoon instant yeast
  • 1 1/4 cups room temperature water
  • 1/4 cup olive oil
  • 1 cup shredded cheese of choice

Instructions

  1. DOUGH: In a large mixing bowl, with something basic like a wooden spoon, combine the flour, salt, and yeast together until mixed. Stir in the water and olive oil until a chunky, thick dough forms. If it needs a little more water, add just a few more tablespoons. Gently stir in the cheese. It’s gonna look scrappy and weird and you’re going to question me, but just you wait.
  2. REST: That’s it. You don’t have to touch a thing. Just cover the mixing bowl with plastic wrap, or a towel, and let it rest for 12-18 hours at room temperature. Overnight is ideal.
  3. BAKE: When it’s baking time, preheat the oven to 450. Stick a 6 quart Dutch Oven (or similar) in the oven for about 30 minutes to preheat. At this point, the dough should be big and puffy and pretty loose, with little bubbles in it. Gently scrape the dough out onto a well-floured surface. (Remember: NO KNEAD.) Gently shape it into a ball with flour on the outside, set on a piece of parchment, and wait for your pan to heat up.
  4. BAKE: Lift the dough and parchment together into the pan. Bake, covered with a tight fitting lid, for 30 minutes. Remove the cover and bake another 10-15 minutes to get the exterior nice and golden brown and crispy. Now start breaking chunks off, admiring the cheesiness, spreading with butter and salt, and dunking in all your best soups. THIS IS LIVING!

Notes

I like to use cheddar cheese, white cheddar cheese, pepperjack cheese, and Gruyere cheese. All make for a differently-flavored and slightly differently textured bread! All are delicious!

If you want to get a melty cheese bread situation, check out our spicy cheese bread that gets rolled up.

Recipe Card powered by

The post No Knead Cheese Bread appeared first on Pinch of Yum.


from Pinch of Yum https://ift.tt/37GsDu0

Monday, November 18, 2019

Spicy Peanut Tofu Bowls

If you asked me what I eat when I’m just being regular me in my regular life, like, not trying to make anything impressive for a blog or a brand partner or a cool Instagram picture, I would say PEANUT TOFU BOWLS.

This has been my real-life meal prep lifesaver over the last few months.

And it is complex in salty-sweet flavor and sticky-crunchy texture, and loaded with nutritious good stuff, but also quite simple.

How to make Spicy Peanut Tofu Bowls

  1. Step 1: Make a sheet pan of tofu.

  2. Step 2: Make a sheet pan of veggies.

  3. Step 3: Whip up a peanut sauce. If you love yourself, make a double batch so you can freeze some for later.

  4. Step 4: Make rice. Assemble. And serve. Or pack away for lunches!

Could you:

  • use chicken instead? yes.
  • try mushrooms or green beans or carrots instead? yes.
  • use cauliflower rice or quinoa? yes.
  • use almond butter instead of peanut butter? yes.
  • use a different sauce altogether, like any one of these 16 sauces that make everything better? yes.

Really, this is a recipe, but this is also a lifestyle. And I say that with only 5% facetiousness.

This a weekly meal prep lifestyle that is keeping me eating well-balanced lunches on the reg during the happy-busy days of November and December. Do you feel me or do you feel me.

So easy, so low-key, SO VERY DELICIOUS! My favorite way to roll.

Spicy Peanut Tofu Bowls


  • Author: Lindsay
  • Prep Time: 10 minutes
  • Cook Time: 30 minutes
  • Total Time: 40 minutes
  • Yield: 6 servings

Ingredients

Tofu:

  • 2 blocks of extra firm tofu
  • 12 tablespoons cornstarch
  • olive oil and salt
  • 2 small (or 1 large) head of broccoli, cut into florets
  • 2 red bell peppers, cut into strips
  • 1 1/2 cups uncooked rice

Peanut Sauce:

  • 1/2 cup peanut butter
  • 1/3 cup low sodium soy sauce
  • 2 tablespoons sesame oil (toasted or dark)
  • 2 tablespoons rice vinegar
  • 2 tablespoonsambal oelek or chili paste (this is where the “spicy” comes in, so add to taste)
  • 2 tablespoonsugar, honey, or agave
  • a small knob of fresh ginger, peeled
  • a clove of fresh garlic, peeled

Instructions

  1. Press liquid out of the tofu. Cube tofu and toss (gently) with the cornstarch until coated. Arrange on a baking sheet lined with parchment. Arrange broccoli and peppers on another baking sheet. Drizzle all with olive oil and salt. Roast both pans at 425 degrees for 20-30 minutes, until tofu is slightly crisped and broccoli is roasty and delicious.
  2. While the tofu and broccoli are roasting, cook the rice.
  3. Also, make the sauce by blending everything in a blender or food processor.
  4. Serve tofu and broccoli with rice and a good drizzle of peanut sauce. YUM!

Notes

For an exceptionally dry and chewy tofu, keep your tofu in the freezer! Thaw the day before in the fridge, drain, and press water out as usual. You’ll be able to get more water out that way, and you’ll be left with tofu that has a slightly drier, chewier texture that many people (myself included) find very very delicious.

To get your tofu a little browned, put it on the top rack of the oven, just a few inches from the heat source.

Keeps amazingly well as leftovers – I keep mine for a full 5 days!

I topped my bowls with black sesame seeds to make it extra pretty.

Recipe Card powered by

The post Spicy Peanut Tofu Bowls appeared first on Pinch of Yum.


from Pinch of Yum https://ift.tt/32ZAMX0

Wednesday, November 13, 2019

Squash Salad with Kale and Roasted Garlic Dressing

This recipe is sponsored by ALDI

This stunning, fallish, kind of addicting salad goes out to all the people who love to make vegetables taste cozy.

Without fail, I always get asked to bring a salad or vegetable dish to Thanksgiving. And salads at Thanksgiving… well, you know how it is. You really need to make it count, otherwise might as well forget it. It’s hard to compete with mashed potatoes and turkey and all the other yummy regulars.

But this salad is not forgettable. It has all the elements of a winner.

I love this recipe because:

  • it’s vegan, so everyone at our table can eat it!
  • it’s delicious served cold like a salad or warm like a… warm salad.
  • it’s beautiful on a holiday table, and honestly also just beautiful in your lunchbox.
  • squash, chickpeas, kale, apples, pepitas, dried cherries and roasted garlic dressing JUST WORK TOGETHER.

I got my ingredients for this salad entirely at ALDI, with special shout outs going to the cute butternut squash, the huge bag of organic kale, and the crispy little pepitas and juicy bites of dried cherries.

I know a lot of you already know this, but ALDI is *the* place for holiday groceries. There are so many organic options (♡) and their prices are SO AFFORDABLE, which works really well when you’re trying to feed about 185 hungry people around the holidays. I love it.

You can click here for a one-stop Instacart grocery list, so all you have to do is schedule delivery and you’re good to go. While you’re there, be sure to use the code ALDIPOY to get $10 off your orders of $35 or more. That code works for first-time Instacart users, and you can use it not once, not twice, but three times!

Okay, here’s how we make this salad.

First: roast the squash, chickpeas and garlic (just wrap it in foil).

Then mash your garlic into a paste and whisk it into dressing.

Then… um, serve it up? Easy and beautiful is how we roll.

Roasted garlicky massaged kale, topped with the squash and chickpeas, and some pretty little apple fans, and dabbles of pepitas and dried cherries, and the final drizzling of roasted garlic dressing over the top. Yeah. Gorgeous.

Goat cheese, Parm, or bacon would be lovely additions, too, but maybe put that on the individual salad plates so our vegans can still be happy.

I really love it when real food is this beautiful, simple, wholesome and amazing on the taste buds.

Fall food is the best food.

Squash Salad with Kale and Roasted Garlic Dressing


  • Author: Lindsay
  • Prep Time: 20 minutes
  • Cook Time: 30 minutes
  • Total Time: 50 minutes
  • Yield: 6 as a side

Ingredients

Salad:

  • 1 butternut squash, peeled and cubed (about 3 cups)
  • 1 can Dakota’s Pride Garbanzo Beans, rinsed and drained
  • a drizzle of oil
  • 1 teaspoon kosher salt
  • 23 cloves garlic
  • 45 cups Simply Nature Organic Chopped Kale
  • 1 honeycrisp apple, sliced
  • 1/2 cup Southern Grove Pepitas
  • 1/2 cup Southern Grove Dried Cherries

Dressing:

  • 1/2 cup olive oil
  • juice of 1 lemon
  • 1/2 teaspoon salt (more to taste)
  • black pepper to taste
  • 1 tablespoon sugar

VERY IMPORTANT: Click here to get ALL of these ingredients delivered via Instacart! And if this is your first time, don’t forget to use the ALDIPOY code for $10 off your order of $35 or more.


Instructions

  1. Roast: Preheat the oven to 425 degrees. Place squash and chickpeas on a sheet pan. Drizzle with oil, sprinkle with salt. Place garlic cloves in the center of a small piece of foil. Drizzle with oil and fold it up into a little packet. Place the packet on the sheet pan. Roast everything for 30-40 minutes.
  2. Dressing: Whisk the oil, lemon juice, salt, pepper, and sugar together. When the sheet pan comes out of the oven, mash up the roasted garlic and add it to the dressing. 
  3. Kale: In a large bowl, drizzle the kale with a little bit of dressing (hello, flavor!). Massage it – as in, just, like, squeeze it – until it’s deep green and the texture has relaxed a little bit. This just makes it more tender and pleasant to eat.
  4. Salad: Place kale in a large salad bowl. Top with squash and chickpeas. Arrange little fanned-out apple slices on the salad (pretty!). Dot the whole thing with pepitas and dried cherries, and finish with the rest of the dressing. Serve warm or cold! IT’S A BEAUTIFUL MASTERPIECE.

Notes

Make ahead: You could definitely roast the squash, garlic, and chickpeas a day in advance. That being said, the texture of the roasted chickpeas will change from crispy to… less crispy after they’ve been roasted and cooled. I don’t think they taste bad that way! Just different. 

  • Category: Salad
  • Method: Bake
  • Cuisine: American
Recipe Card powered by

Thank you to ALDI for sponsoring this post!

The post Squash Salad with Kale and Roasted Garlic Dressing appeared first on Pinch of Yum.


from Pinch of Yum https://ift.tt/2Qevwfy

Monday, November 11, 2019

Chicken Pot Pie with Biscuits

This recipe is sponsored by Land O’Lakes, Inc.

This feels like a good time to say something profound, which leads me to this:

Chicken pot pie is just so good.

Sautéed shallots and thyme, a splash of white wine, creamy chicken, peas, and carrots all baked under a homemade biscuit topping. It’s rich with lots of layers of flavor, but it’s humble and old-fashioned in all the right ways. It just goes straight to the heart.

It is the very essence of comfort food. And if you cross me on this, I’ll bring you a chicken pot pie with biscuits to change your mind.

I have strong-ish feelings that biscuits are better than actual pie crust when it comes to chicken pot pie.

Reasons I like biscuits better:

  • They are easier and faster to make from scratch.
  • They are more forgiving.
  • They are arguably MORE delicious.
  • THEY ARE BUTTERY LITTLE BISCUITS FOR CRYING OUT LOUD.

When starting on your pot pie adventure, there are three important Biscuit Things to consider.

  1. Use good butter. We use Land O Lakes® Butter (a Minnesota company! heyo) and it is a dream. I used regular salted butter here, but their Extra Creamy Butter (which has a higher percentage of butterfat) also makes excellent biscuits.
  2. Grate your butter. See how it looks like grated cheese in the picture? Yep. Grate it.
  3. Don’t overmix everything. Just gently bring it together, fold it out once or twice, and then cut straight down with your biscuit cutter – AS IF! More like the rim of a drinking glass. If you own a biscuit cutter you are light years ahead of me.

Gravy in the pan, biscuits on top, a quick trip to the oven and….

Love of your life – creamy, buttery, and savory – speaking to you right here.

I can think of zero situations that are not improved drastically by a chicken pot pie with biscuits.

Chicken Pot Pie with Biscuits


  • Author: Lindsay
  • Prep Time: 45 minutes
  • Cook Time: 15 minutes
  • Total Time: 1 hour
  • Yield: 6

Description

Chicken Pot Pie with Biscuits! Sautéed shallots and thyme, a splash of white wine, creamy chicken, peas, and carrots all baked under a homemade biscuit topping. YUM.


Ingredients

Biscuits:

  • 2 cups flour
  • 1 tablespoon baking powder
  • 1 tablespoon sugar
  • 1/2 teaspoon kosher salt
  • 6 tablespoons very cold Land O Lakes® Salted Butter
  • 3/4 cup whole milk

Filling:

  • 4 tablespoons Land O Lakes® Salted Butter
  • a few sprigs of thyme
  • 2 shallots
  • 4 carrots, peeled and sliced thinly (about 2 cups)
  • 4 celery stalks, chopped (about 1 cup)
  • 1/4 cup flour
  • splash of dry white wine (optional)
  • 2 cups whole milk
  • 1 1/2 cups chicken broth
  • 4 cups shredded chicken (I use a rotisserie chicken)
  • 2 cups frozen peas
  • 1 teaspoon salt
  • squeeze of lemon juice, black pepper, etc.

Instructions

  1. Prep: Preheat the oven to 425 degrees.
  2. Biscuits: Mix flour, baking powder, sugar, and salt together. Grate butter and work it into the dry mix with your hands. Add milk and stir gently with a fork to bring it all together. Turn dough out onto a clean counter. Fold it over a few times to get it into a 1-2 inch thick layer. Cut 6-10 biscuits from it using a biscuit cutter, rim of a drinking glass, or… just a knife. Let’s not be too precious here.
  3. Filling: Melt the butter in a large oven-safe Dutch oven or pan. Add the thyme and shallots; sauté for 5 minutes. Add the carrots and celery; sauté for 5 minutes. Add the flour; sauté for 1-2 minutes. Add a splash of wine; let it sizzle out. Slowly and gradually, add the milk and the chicken broth, stirring after each addition. The mixture should resemble a thick, creamy soup. Add chicken and peas. Season with salt, pepper, and lemon juice.
  4. Bake: Arrange biscuits on top of filling. Brush biscuits with milk or butter for extra browning. Bake for 15-20 minutes, until hot, bubbly, and biscuits are cooked through.

Recipe Card powered by

Thank you to Land O’Lakes for sponsoring this recipe!

The post Chicken Pot Pie with Biscuits appeared first on Pinch of Yum.


from Pinch of Yum https://ift.tt/36MX29P