It seems almost silly to write any more since you, like most normal people, saw “Cinnamon Rolls” and are like, “Yes! In! This is the only gift I need this holiday season!”
You probably started thinking about your favorite part of the cinnamon roll which is OF COURSE, the center. The gooey, soft, pull-apart, cinnamon-slathered, sweet, perfectly glazed bite. The bite you waited for the whole time or, if you’re like some of us, the only bite you took and then discarded the rest because why botherrrrr?!
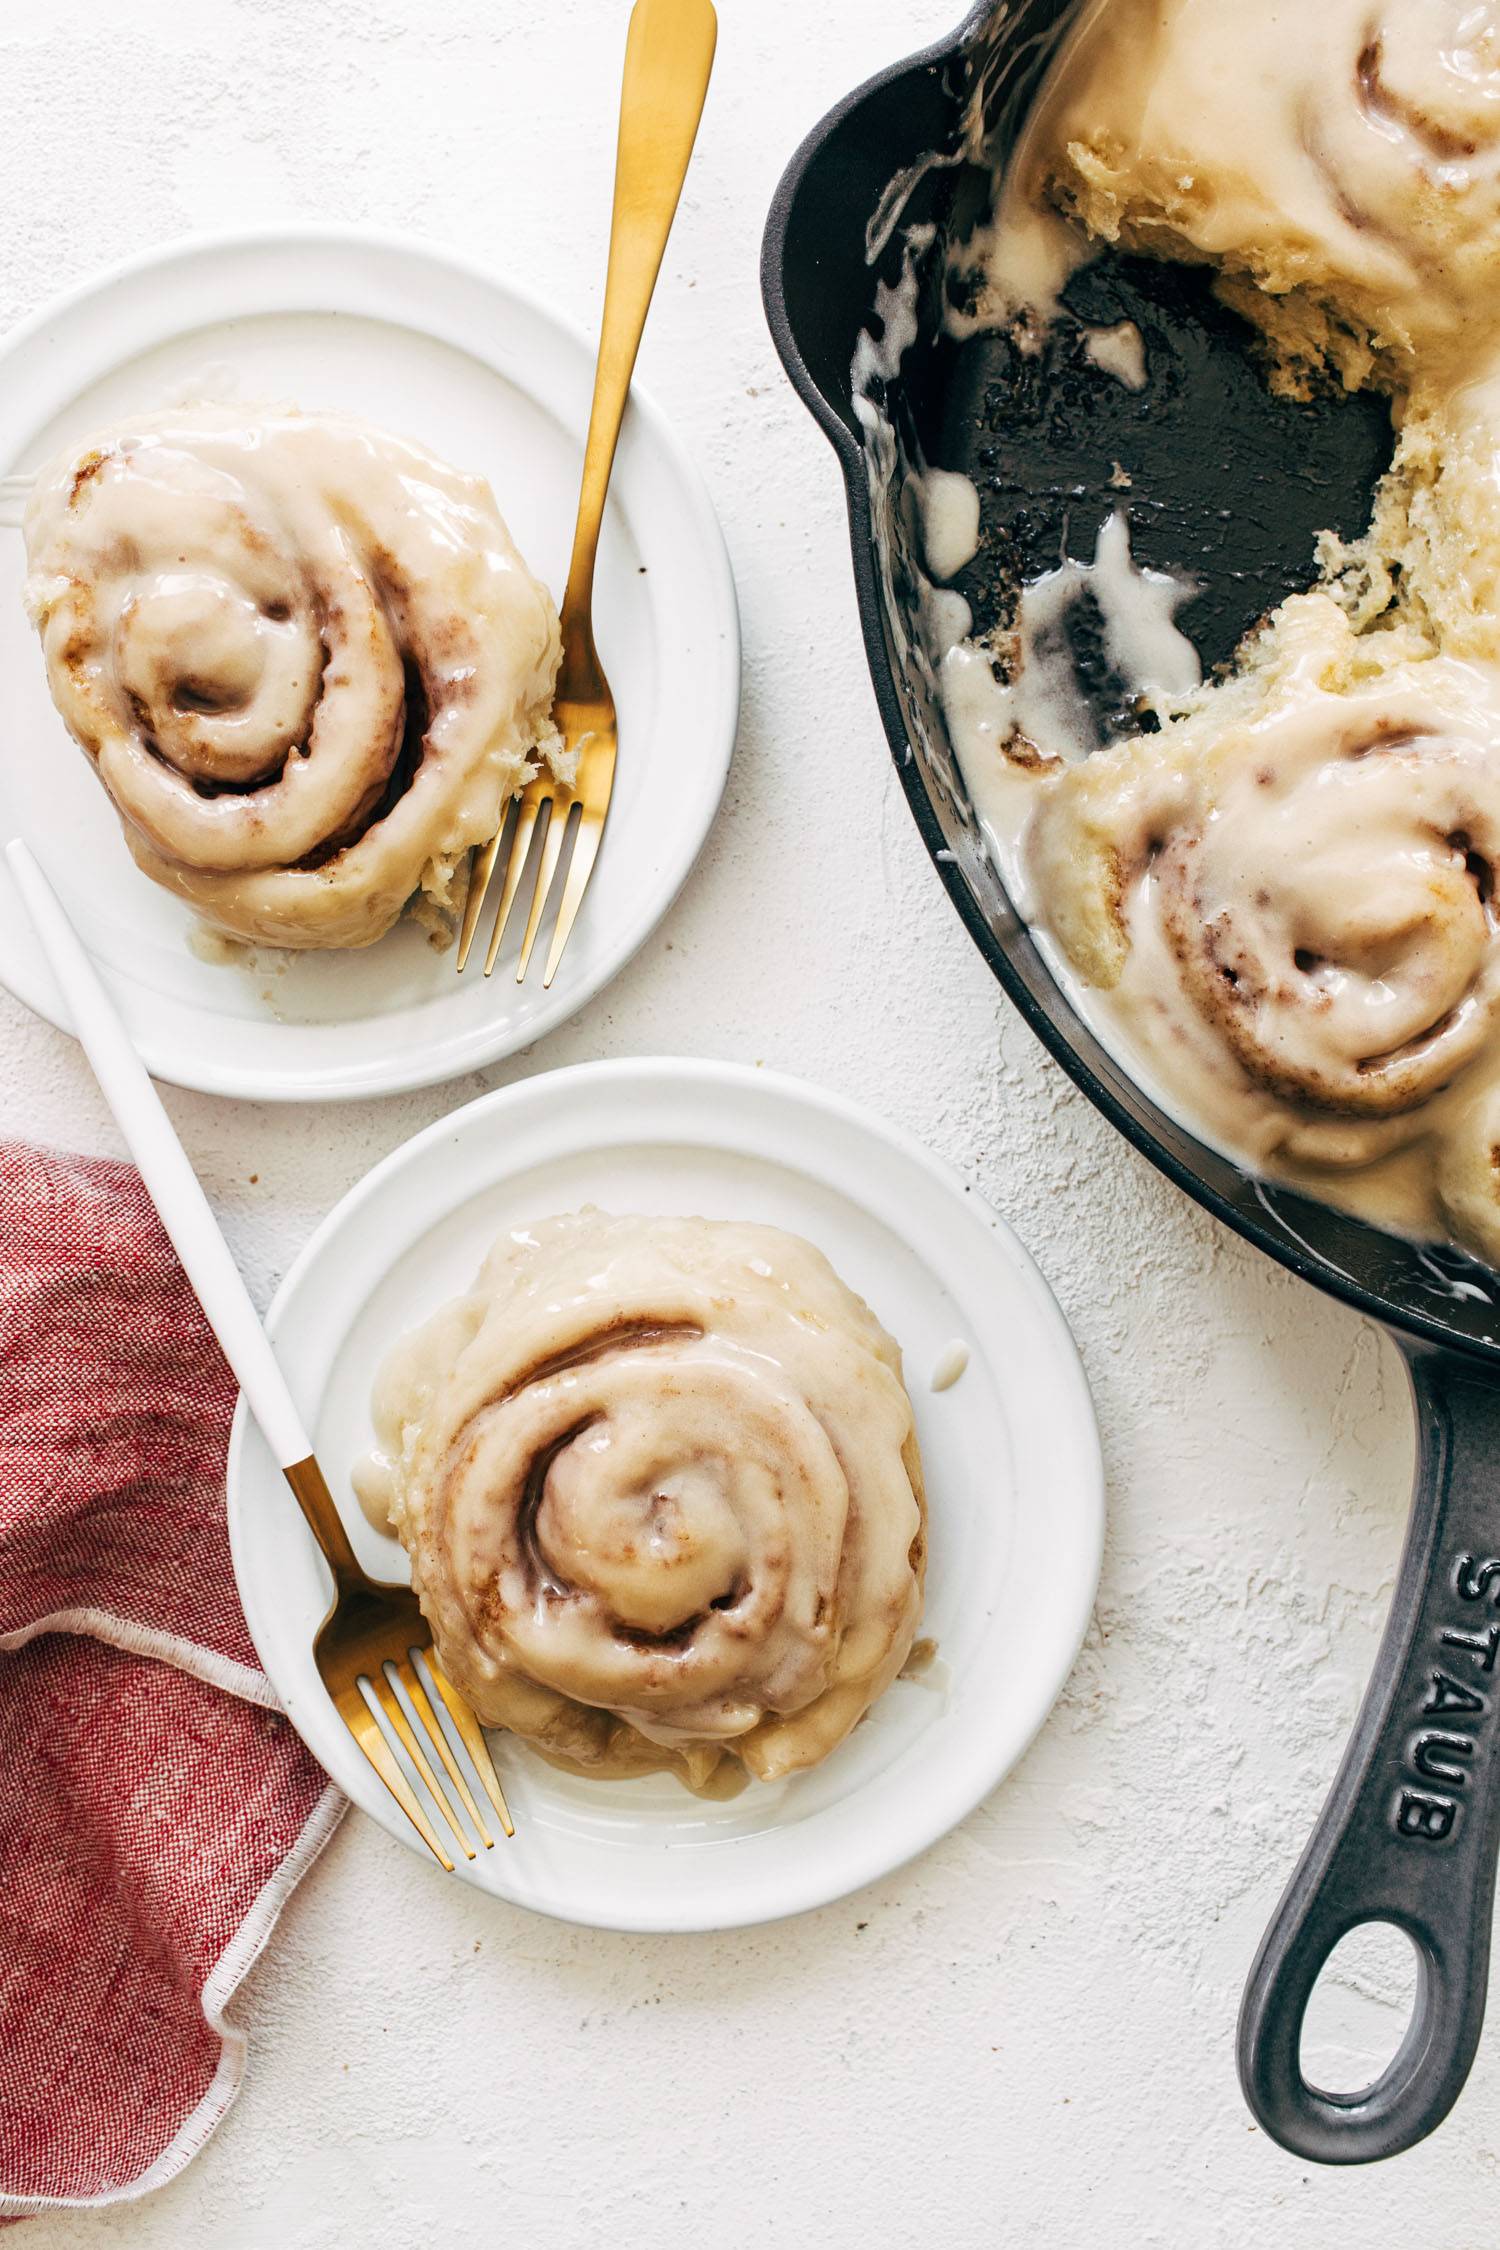
Well, what if the whole cinnamon roll *was* like the center? What if every single bite was light and soft and buttery and sweet? What if the entire thing was draped in a silky smooth cream cheese glaze that seeped and sneaked into every single available warm cinnamony pocket? Yes. Yes. Goodbye dry, hard glaze-less outer bready bits! We’re here for brioche and we’re never turning back.
Your holiday brunches, your quiet mornings with a hot cup of coffee before everyone wakes up, your treat plate on the counter where you sneak bites in between all the stirs and mashes and temp checks of holiday meal prep…all of this just got so much more delicious.
Ingredients You’ll Need
To make these pillowy dream machines come together, you’ll need some time and some patience and some butter. Those are definitely the big things, but there’s a few other ingredients on the list too.
- eggs
- flour
- yeast
- honey
- white, brown, and powdered sugars
- cinnamon
- vanilla
- cream cheese
- butter (butter lovers, this is your moment to shine!)
About that butter. The absolute key to this perfect cinnamon roll, in our humble opinion (but also not humble…hiiii this is the best cinnamon roll!), is the brioche dough. It’s soft and sweet and airy. It is absolutely made to be soaked in cinnamon and sugar and warm drippy glaze.
The dough recipe itself is enough to make 3 batches of rolls so you can make one batch now and save the rest for another time that you want to make everyone’s day so much better. Or in case you want to make a pan all for yourself to eat while you’re baking another batch to put out on the table for everyone else. They don’t have to know. We’ll never speak of it. Your secret is safe with us.
How To Make Perfect Cinnamon Rolls
There are some steps here. There is a little bit of time and planning and love that goes in, but what are the holidays if not time and planning and love. And we promise, absolutely all your efforts will be rewarded. BIG TIME.
- Make the brioche. This really is meant to be an overnight process. You’ll mix your dough together, all sweet with honey and rich with butter, and then cover her loosely and let her double in size (about 1-2 hours). After that, just go ahead and pop her in the fridge and go to bed. The brioche dough really is so much easier to work with after a chill because of all the…ahem, butter. So go, dream of the warm cinnamon morning that awaits you.
- The morning of. When you’re ready in the morning, pull the dough ball out and cut the dough into thirds. You’ll use one for this batch and you can fridge/freeze the other two. Roll out your dough into a large rectangle. If you’re really on top of things and a very normal person, you know where your rolling pin is. If you’re us, you grab the nearest cylindrical object and get at it. To each their own.
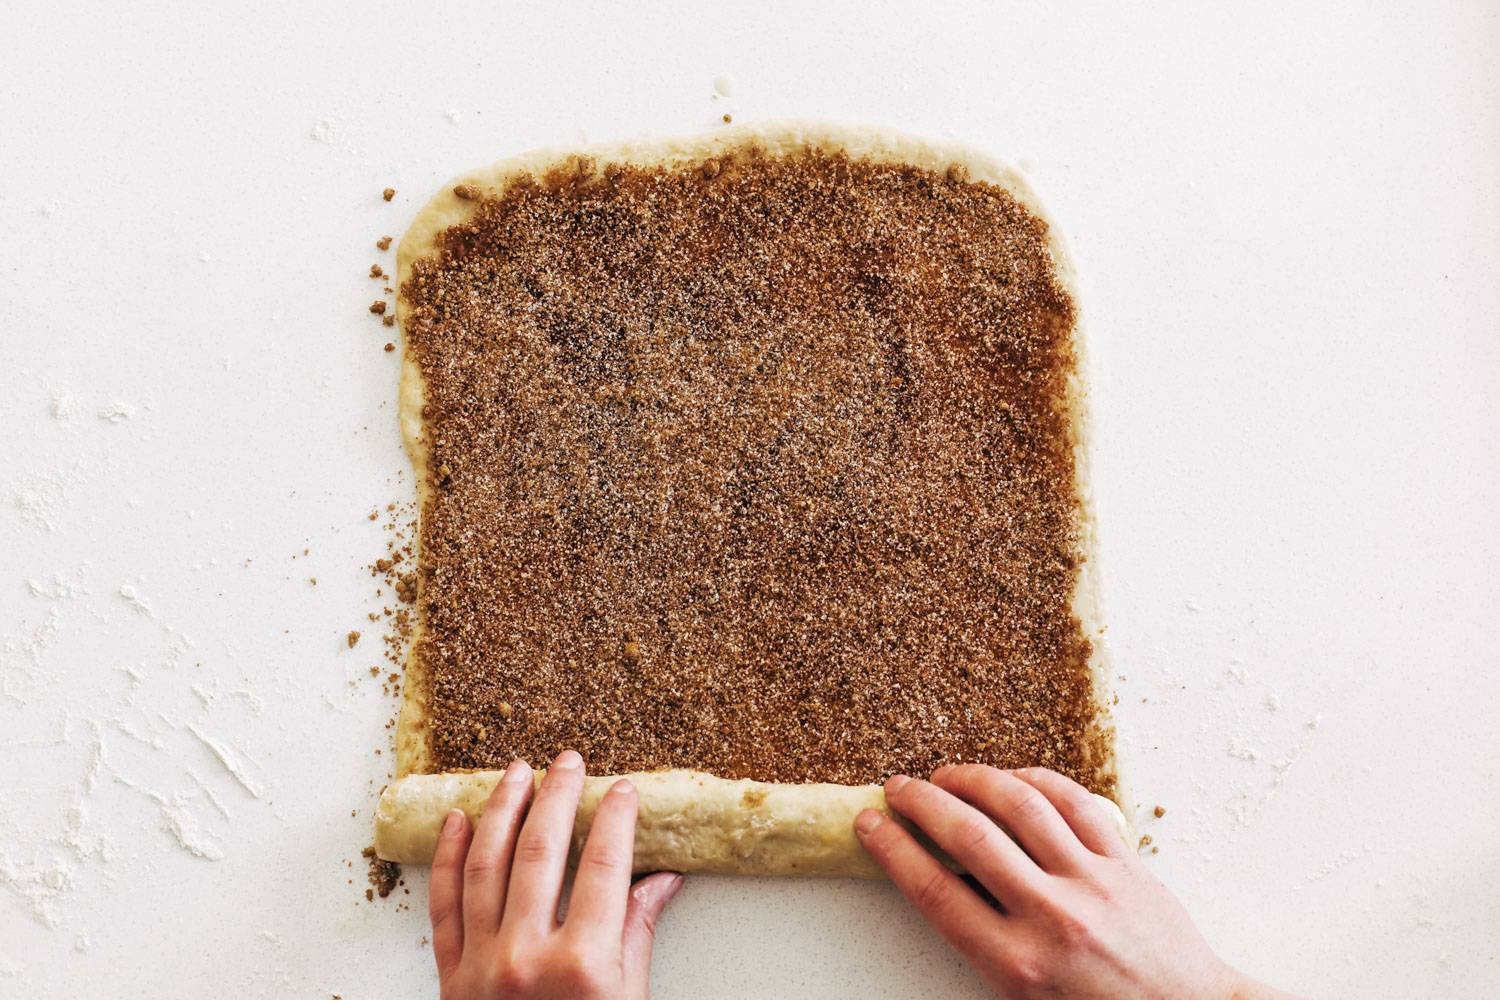
- Make the filling. Mix together your cinnamon, your sugars, and your melted butter. If you really want to get fancy you can stick some orange zest in there, maybe some cardamom, some cocoa?! The world really is your oyster, but we’re keeping it traditional in this one.
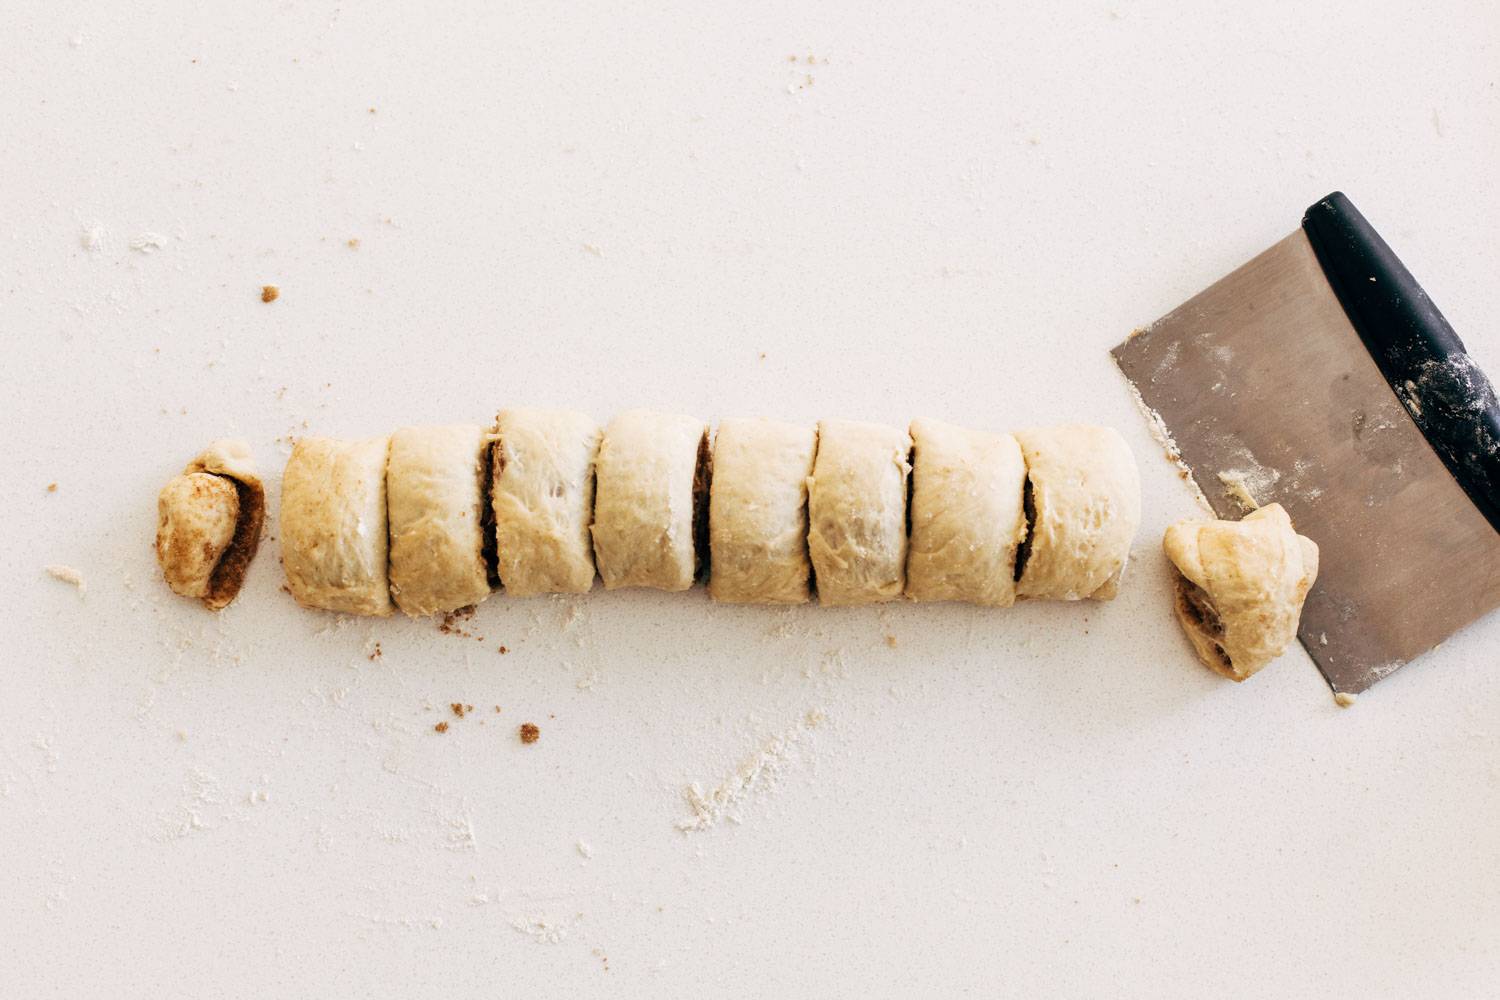
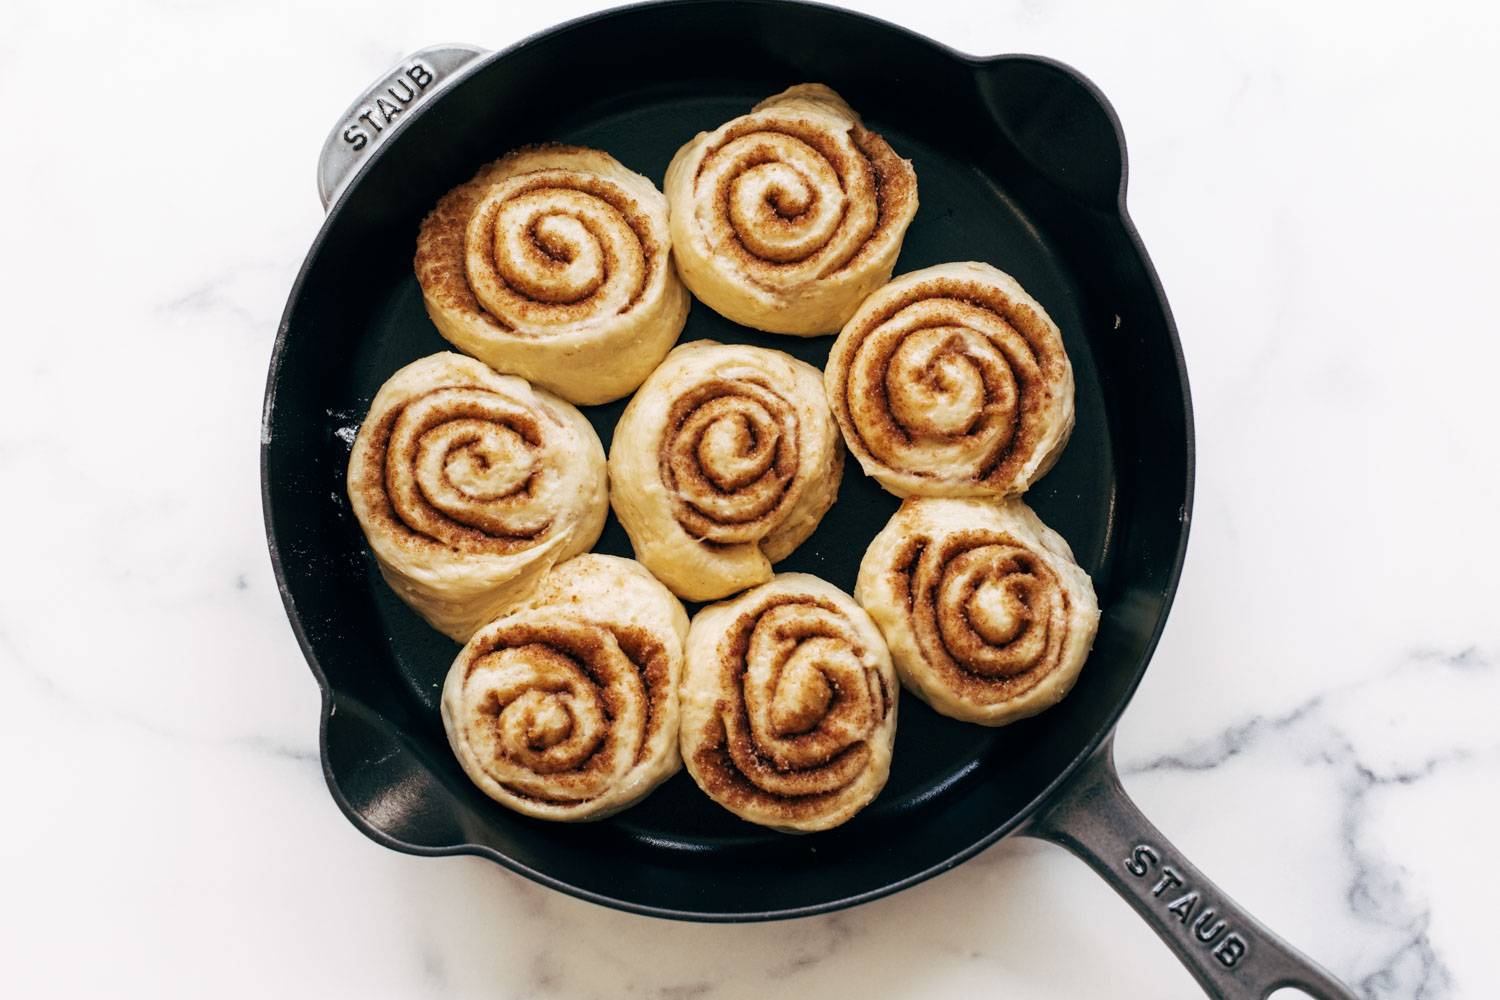
- Form the rolls. Spread the filling over your dough and then roll it up, starting from the short end. Trim the uneven ends (but don’t you dare leave those! toss them in a ramekin and bake them up, make little cinnamon twists…point being, bake a tiny snack with them). Cut the log into 6-8 equal pieces and place them in your pan. Give them another 1 hour 15 minute rest (maybe also sneak one of those in for yourself?) in the pan to help ensure the puffiest cinnamon rolls…which is definitely always what we’re going for.
- Bake. After they rise, bake for about 20 minutes (we definitely err on the side of under-baking for optimal squish). Let the coziest, merriest, warmest kitchen smells commence!
Let’s Talk Glaze
You’re already going to be peeking in that warm oven and absolutely high-fiving yourself left and right as you watch them pillow up over the top of the pan, but there is still more glory to come! That’s right, it’s a smooth, silky, thin but not too thin, covers and drips over everything cream cheese glaze. Icing? Glaze? Reason for living? Whatever you call it, this one is just about perfect.
So there are some tips and tricks here because sometimes a glaze wants to lump, and we’re not having that. So you’ll want to make sure your cream cheese is VERY soft to start and that you whip it really smooth before you begin slowly incorporating the milk and sugar and vanilla so everything stays silky.
Then it’s up to you where to go next! If you drizzle the glaze on right away, the better chance it has to seep all throughout the cinnamon rolls for a gooier, squishier, all around dreamier holiday morning experience. If you wait for the rolls to cool a bit first, it definitely acts a little more like a frosting sitting up on top, still delicious and completely devourable.
You can also have some fun here if you’re feeling it. A little maple syrup in that glaze perhaps? Or a swizzle of honey to bring out the honey in the brioche? Did you zest some orange in that filling, how about a splash of orange juice in your glaze for a sweet citrusy twist? Play around, make them your own, make them again and again and again.
We really do not know how you could possibly go wrong! Even if you do get some lumps. Can fully attest that the whole team ate a full batch of lumpy-icinged cinnamon rolls with RECKLESS ABANDON and zero regrets.

In a way, making these perfectly soft, pillowy, sweet cinnamon rolls is a lot like gathering friends and family for the holidays. It takes a little time and patience and planning. But once everyone is all tucked in and ready to go, there’s nothing more warm, more cozy, more joy-giving than having them at the table.
Cinnamon Rolls: FAQs
If you have leftovers (ha) keep them in a sealed container in the fridge and they should stay fresh for a few days! Reheat in the microwave or oven until warm.
Just pop it in the oven at 350 degrees for a quick 5 minute rewarming treatment, or about 30 seconds in the microwave.
You can store it wrapped in plastic wrap in the fridge for a couple days – after that, transfer to the freezer for up to 3 months. See recipe for more specific instructions!

House Favorite Cinnamon Rolls with Cream Cheese Glaze
 Total Time: 51 minute
 Yield: 8 cinnamon rolls
Description
Our House Favorite Cinnamon Rolls – the ones we make every year! With pillowy brioche dough and cream cheese glaze tucked into every bite. This makes a BIG batch of dough that you can divide and save for later…or make extra all for yourself!
Ingredients
Cinnamon Roll Brioche Dough:
- 1 cup lukewarm water
- 2 teaspoons instant yeast
- 2 teaspoons salt
- 1 cup butter, melted
- 4 eggs
- 1/3 cup honey
- 5 cups flour
Cinnamon Roll Filling:
- 2 tablespoons butter, melted
- 1/4 cup white sugar
- 1/4 cup brown sugar
- 1 teaspoon cinnamon
Cream Cheese Glaze:
- 4 ounces cream cheese, very soft
- 1/3 cup powdered sugar
- 2 tablespoons milk (more as needed)
- 1 teaspoon vanilla extract
Instructions
- Make the Dough: Start by adding the water and yeast to a bowl. Add all the other dough ingredients to the bowl and mix with a wooden spoon until combined. It will be messy, sticky, and loose. You can transfer to a clean bowl if you want – then cover loosely with plastic wrap or a towel, and let her rest at room temperature for 1-2 hours until it has puffed up and doubled in size. Put the bowl in the fridge, covered, to store at least overnight, so the dough has time to chill and become easier to handle. When you’re ready for rolls, remove the dough and cut the whole dough ball into thirds. Each third (about the size of a grapefruit) will give you a 6-8-roll batch of cinnamon rolls. You’ll use one third for this recipe, and the other two thirds can be stored in the fridge or freezer – THE BEST PART ABOUT THIS RECIPE! See notes.
- Filling and Glaze Prep: For the filling, mix the sugars and cinnamon in a small bowl. For the glaze, use an electric mixer to beat the softened cream cheese until smooth and creamy. Mix in the powdered sugar, vanilla, and a little bit of milk at a time until you get a smooth glaze.
- Assembly: Roll your dough ball (the one-third chunk from step one) out into a rectangle a little bigger than the size of a piece of paper – about 9×13, and about 1/2 inch thick. Brush with the melted butter and sprinkle with the cinnamon roll filling. Use your hands to make sure it’s all evenly coated.
- Cut the Dough: Roll the cinnamon rolls up starting at the short side. Cut off any uneven end pieces so both ends have a clean cut. Gently cut your log into 6-8 rolls and place them in a 9×13 pan or a circular pan, with an inch or two of space between. Cover loosely with plastic and let the rolls rest at room temperature for 1 hour and 15 minutes before baking (this helps the rolls puff up a little further). Bake at 350 degrees for 20 minutes. (I like to err on the side of underbaking.)
- Glaze and Enjoy: When they come out of the oven, give them a minute to cool. Then brush or spoon them with the glaze so it gets every crevice coated with gooey, drippy deliciousness. Savor every warm, pillowy, glazed bite. YOU MADE THAT. Cinnamon roll bliss is yours!
Notes
Yield: This makes enough brioche dough for 3 batches of cinnamon rolls, with 8 rolls per batch.
Freezing the Dough, Option 1: You can just wrap your two extra dough balls in plastic wrap and freeze them as a dough chunk – this is what I usually do. The advantage of this is that it allows you the option of using the brioche in something other than cinnamon rolls, like this gooey caramel monkey bread. To thaw the frozen dough chunk, you’ll need to put it in the fridge to thaw about 24 hours before you’re going to use it. Then, once you’ve rolled or assembled it into its final form, give it at least 1-2 hours to rest and rise at room temperature before baking.
Freezing the Dough, Option 2: You can roll out the extra dough into cinnamon rolls and put the individual rolls in the freezer already dressed and ready to go. In that case, put them in the fridge to thaw at least 24 hours before baking, and let them rest at room temperature for at least 2 hours to puff up again before baking.
Cream Cheese Glaze: This is a glaze, not a thick frosting. I love the flavor of cream cheese frosting, but for cinnamon rolls, I prefer something that’s loose enough that can be drizzled or poured rather than spread. So… that’s what this is! As written, you’ll be able to pour or drizzle it over so it can get into every little roll, crack, and crevice of your cinnamon rolls.
- Prep Time: 30 minutes + 12 hours wait time
- Cook Time: 20 minutes
 Category: Dessert
 Method: Bake
 Cuisine: American
Keywords: cinnamon rolls, maple glaze, homemade cinnamon rolls
More Holiday Desserts We Love
- Chocolate Peanut Butter Saltine Toffee (you probably already have all of these ingredients in your kitchen)
- Mint Chocolate Thumbprint Cookies (these are so fun to make!)
- Gooey Caramel Monkey Bread (this caramel is not messing around – it’s so good!)
The post House Favorite Cinnamon Rolls with Cream Cheese Glaze appeared first on Pinch of Yum.
from Pinch of Yum https://ift.tt/3xybosd