Monday, August 30, 2021

Hot Honey Salmon

Hot honey salmon on a sheet pan lined with foil.

What looks fancy but actually comes together super quickly and makes you feel like A BOSS with all that big, feisty flavor?

It’s this. It’s Hot Honey Salmon.

And it’s here for us because this is the SOS series, and fancy-but-not-actually-fancy is the vibe we aspire to.

This is a spicy-sweet little number (hello, “hot honey”) and it gets its name from the sauce that gets brushed over the whole thing, which is grainy from the mustard and flecks of fresh garlic, sweet and sticky from the honey, and a little, medium, or LOT hot from however many red pepper flakes you wanna throw in there. I cannot stress enough how beautiful it is to look at! And it’s one of those salmon recipes that works for even people who aren’t salmon people, because garlic, honey, stone ground mustard, and some peppery heat are magical little wonder foods.

It is about the most foolproof way you could ever think to make salmon. Chaotic dinnertime, stress, and lack of time and energy is no problem for this beauty.

Ingredients for hot honey salmon. Each ingredient is labeled with the name in a purple bubble.

The Ingredient Details

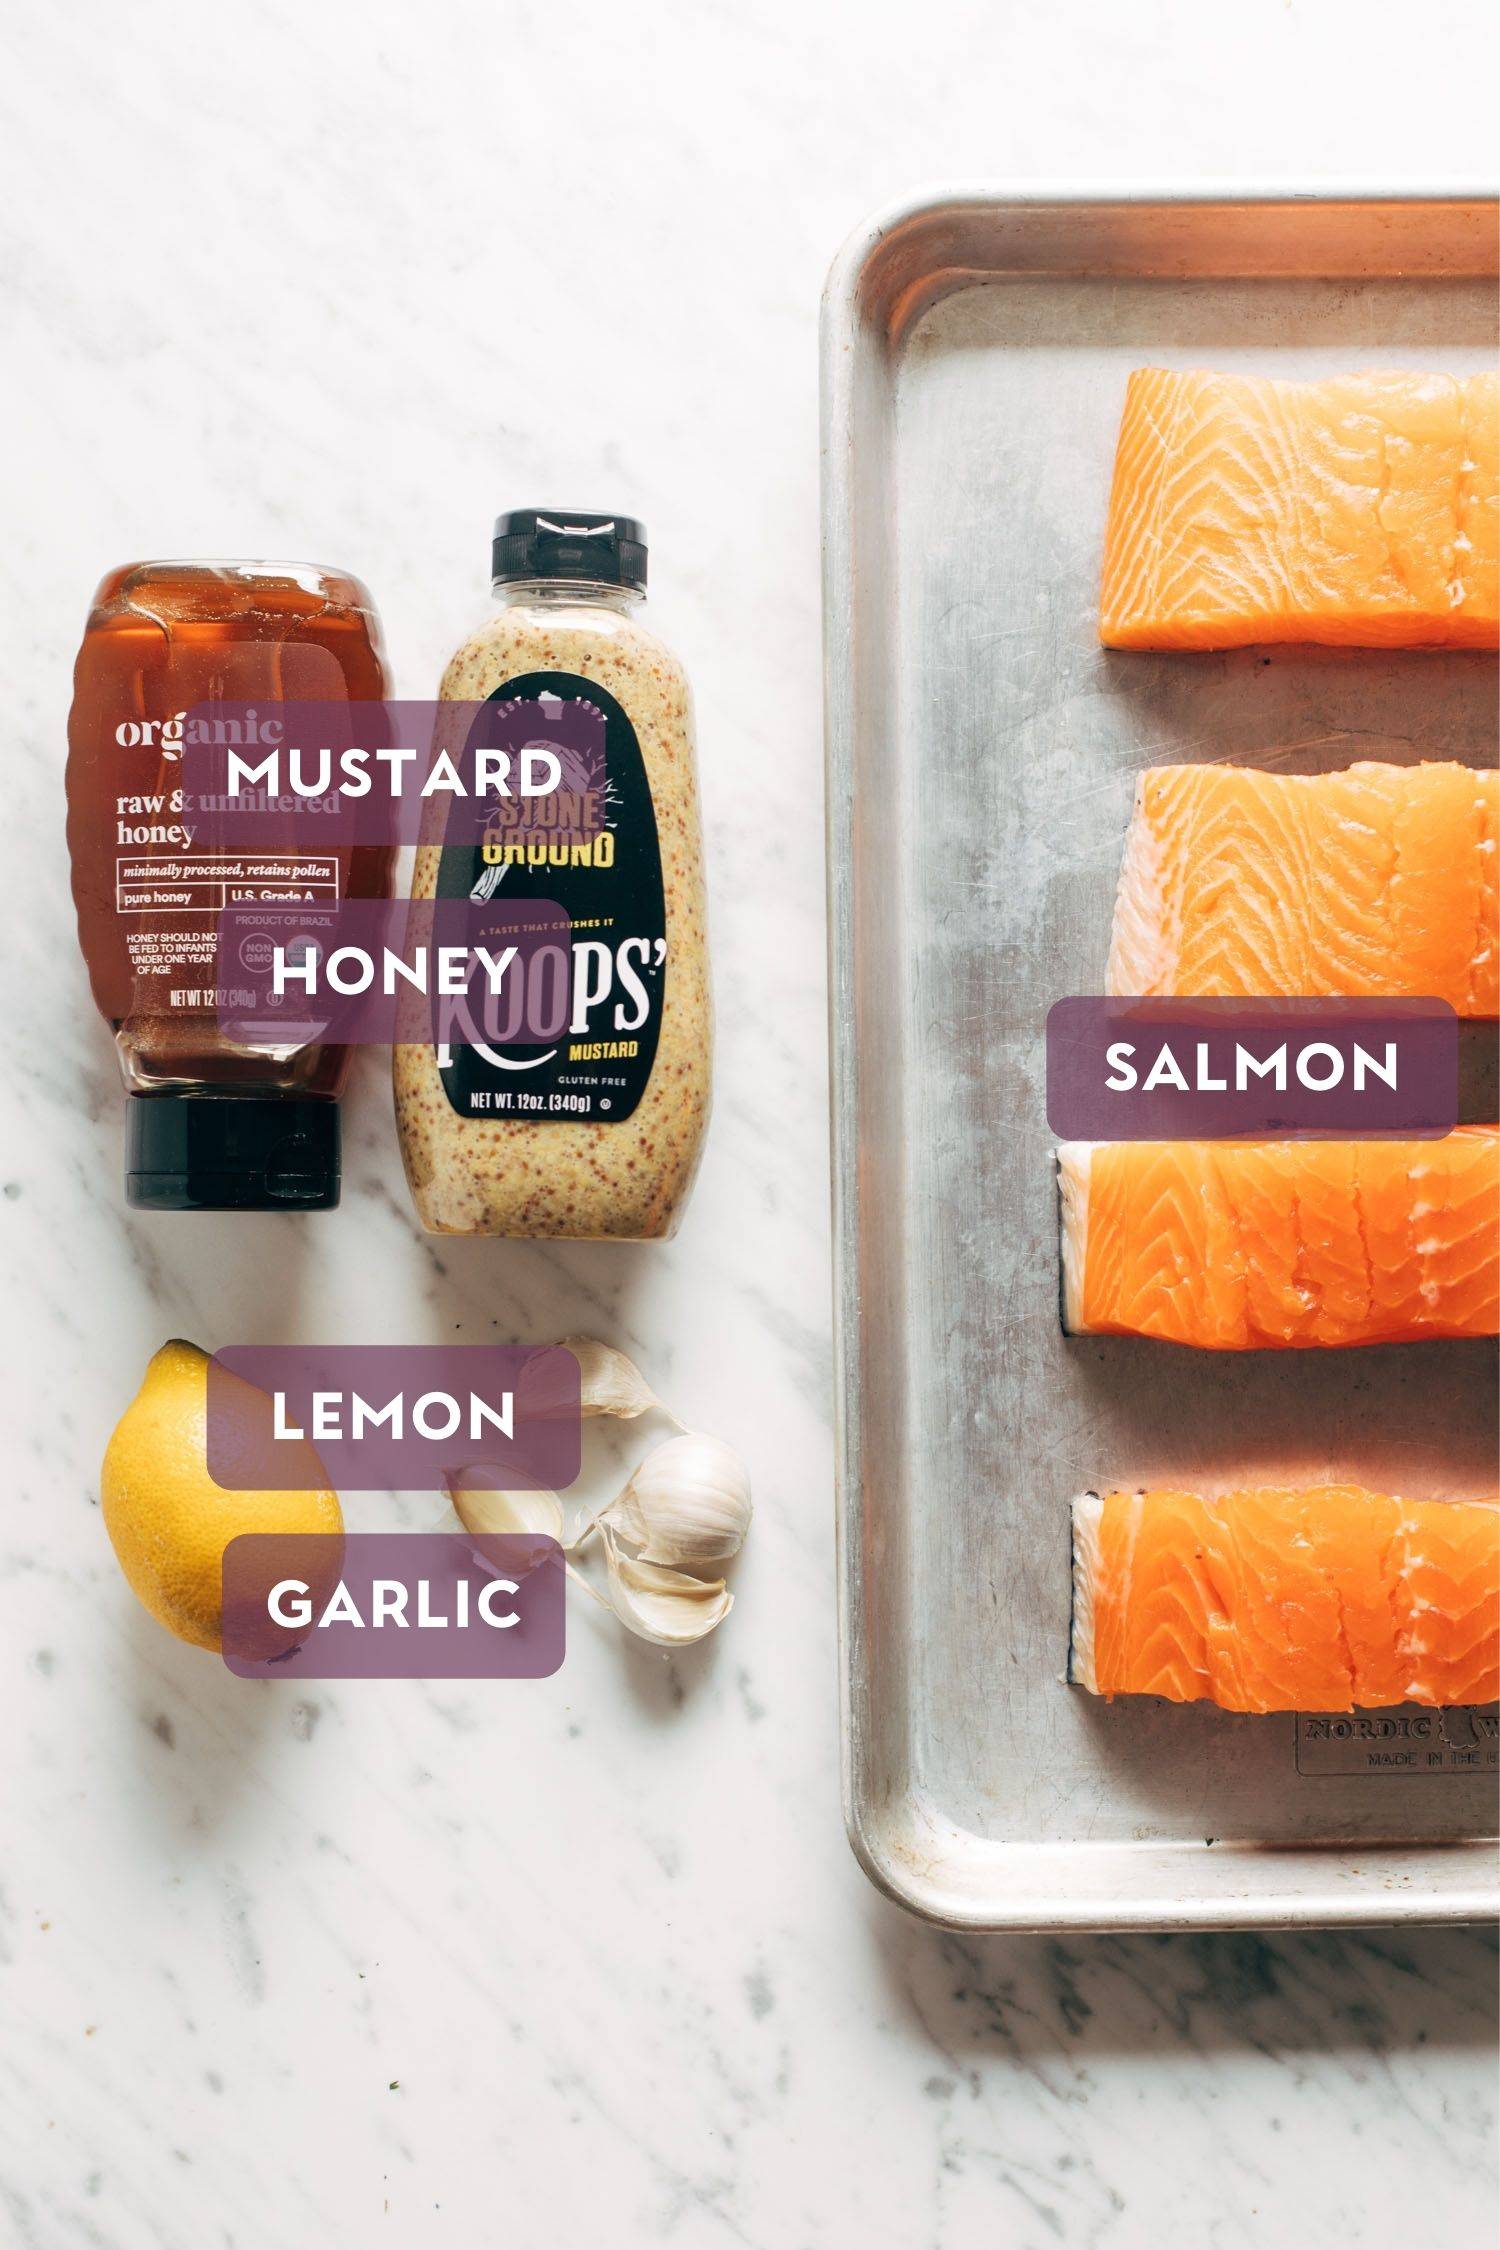
Our basic / fabulous ingredient list:

  • Stoneground mustard
  • Honey
  • Garlic
  • Paprika
  • Red Pepper Flakes
  • Lemon
  • Salmon

… Salt? Olive oil? I’m trying to think if there’s anything else worth mentioning, but I think that’s pretty much the whole shebang right there.

You shake up the sauce, you brush the salmon, and you bake it.

That’s the whole recipe.

And this is why the SOS series is my favorite.

Hot honey salmon in a bowl on top of a green salad. There's a fork on the side of the bowl.

What To Serve with This Salmon

A pro tip: your sauce can actually work really nicely as a dressing, so save a little bit in your jar, drizzle with olive oil, and toss it on some greens and you’ll almost immediately round out your meal.

This salmon is extremely versatile – pair it with those dressed up greens, or steamed green beans from the garden, some roasted potatoes or rice or cauliflower rice or, preferably, HOT CRUSTY BREAD WITH BUTTER, and just enjoy your life, really.

Hot Honey Salmon: FAQs

What kind of salmon should I use?

Fresh Atlantic salmon or wild sockeye salmon work great here! The Atlantic salmon has a bit more fat in it, so the fish doesn’t dry out as easily. It’s so good!

That salad – YUM! How did you make it?

Super SOS-friendly salad here. Just some mixed greens of your choice and toss some of that extra hot honey sauce on your salad for a quick dressing. Another idea is this Toasted Bread and Parmesan Kale Salad – muah! Delish!

Not a big salmon fan here. Anything I can sub?

But have you tried THIS salmon yet? This one might convert you to start proclaiming “Salmon 4 Prez!” If you’re still like 🙅‍♀️

🙅‍♀️ 🙅‍♀️, try the hot honey sauce on some chicken or tofu. Yum!
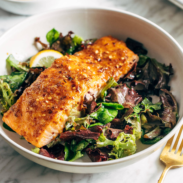
Print

Hot Honey Salmon


  • Author: Lindsay
  • Prep Time: 10 minutes
  • Cook Time: 10 minutes
  • Total Time: 20 minutes
  • Yield: 3-4 servings

Description

This Hot Honey Salmon is giving off major fancy-to-eat-but-not-fancy-to-make vibes. Spicy-sweet salmon coated in fresh garlic, stone ground mustard, sweet honey, and flecks of red peppers flakes. It’s a magical little number! 


Ingredients

Units
  • 2 tablespoons honey
  • 1/4 cup stone ground mustard
  • 34 cloves of garlic, minced
  • juice of 1 lemon
  • 1/2 teaspoon kosher salt
  • 1/2 teaspoon red pepper flakes (optional)
  • 1/2 teaspoon paprika (optional, for color)
  • 12 pounds salmon (I usually buy it in one filet and then cut into 3-4 individual pieces)

Instructions

  1. Make the sauce: Preheat the oven to 400 degrees. Mix the sauce ingredients in a small dish.
  2. Bake the salmon: Line a baking sheet with foil (optional, but makes cleanup much easier). Place salmon skin side down. Brush or spoon the sauce over the salmon, getting it really well coated on top. Bake for 8-10 minutes depending on desired doneness and the thickness of your salmon filets, and broil for just a few minutes at the end to get it extra browned and pretty on top.
  3. Finish and serve: Top each piece with more red pepper flakes. Serve with little lemon wedges, plus a green salad and maybe (for surely) a hunk of hot, crusty, buttered bread. Dreamy.

Notes

Salad hack: If you take care not to dip your raw salmon utensils back into the sauce, you can repurpose any remaining sauce as a dressing for some spring greens! Just add a little olive oil and red wine vinegar, and there’s your dressing. Easy green salad, done.

  • Category: Dinner
  • Method: Bake
  • Cuisine: American

Keywords: baked salmon recipe, hot honey salmon, easy salmon recipe

Recipe Card powered by Tasty Recipes logo

More Salmon Recipes To Make ASAP

The post Hot Honey Salmon appeared first on Pinch of Yum.


from Pinch of Yum https://ift.tt/3yt4ByQ

Friday, August 27, 2021

How To Cook Perfect Rice

Image that say "How to Cook Rice." There's a bowl of white rice with flecks of cilantro and lime wedges behind it with a spoon in the rice bowl.

It’s really hard to get any better than fluffy, perfectly steamy rice as a vehicle for all your favorite curries or bowls or sides or burrito guts or…whatever pairs-well-with-rice friend you can think of.

Unless, of course, you can’t get that fluffy, perfectly steamy rice to begin with. But the perfect batch of rice doesn’t need to be intimidating! Here are our favorite tips and tricks on getting the perfect texture and cook on that tiny little grain.

Pluuuuuus, bonus alert, we’ve got some of our fave variations like coconut rice and cilantro lime rice which, depending on the recipe, can really make things S-I-N-G. So here’s to happy rice times, enjoy!

How To Cook Rice

Using the Instant Pot (we consider this our perfect rice)

Grid of four photos showing how to cook white rice in the Instant Pot.
  1. Give your rice a rinse in a fine-mesh strainer to remove some of the extra starch. Rinse until the water turns from cloudy white to clear.
  2. Toss your rinsed rice in the Instant Pot with water and a pinch of salt. Use 1 1/4 cup water for long-grain white rice or brown rice.
  3. Start cooking your rice. Make sure to seal the valve on the top of your Instant Pot. If you’re making long-grain white rice, cook for 3 minutes with 10 minutes of natural pressure release. If you’re making brown rice, cook for 15 minutes with 5 minutes of natural pressure release.
  4. When your rice is finished cooking, release any remaining pressure and fluff your rice with a fork. Perfect rice ready to eat!

Using the Stovetop

Grid of four photos showing how to cook white rice on the stovetop.
  1. Give your rice a rinse. Just 30 seconds in a fine-mesh strainer works here to clean your rice and get rid of some of the extra starchiness. Just rinse until the water turns from cloudy white to clear. Keep your eye out for teeny tiny rocks or debris that need to be picked out, too.
  2. In a medium pot, add 2 cups of water for every 1 cup of long-grain white rice or brown rice you want to cook. Make sure to salt your water well, then bring your water to a boil.
  3. Once the water is boiling, add in your rinsed rice. You’ll notice the rolling boil will mellow out a bit. Wait until the water starts to boil a bit again and turn the heat down to low to simmer the rice.
  4. Cover the pot. Make sure to not peek inside to see how the rice is doing or you’ll let out all the steam that’s helping to cook the rice. If you’re making long-grain white rice, let the rice cook on the stove for about 16-17 minutes. If you’re making brown rice, let the rice cook on the stove for about 45 minutes.
  5. When your rice is finished cooking, remove it from the heat and let it sit covered for an additional 10 minutes.
  6. Remove the pot cover and fluff your rice with a fork. Voilà! Perfect rice every single time.

Variations On Rice

How to Make Coconut Rice

  1. Prepare rice as normal using 1 can of coconut milk instead of water and use 2 cups of jasmine rice.
  2. Fluff rice and enjoy!

How to Make Cilantro Lime Rice

  1. Cook rice as normal.
  2. Add a handful of chopped cilantro to the rice with a large squeeze of lime juice.
  3. Fluff rice to combine and enjoy!

How to Make Spanish Rice

  1. Add a couple tablespoons of oil to a medium size pot and add 1 cup of long-grain white rice.
  2. Toast rice until it’s golden brown in color.
  3. Add 2 cups of broth, a 4-ounce can of tomato sauce, a clove of minced garlic (or a teaspoon of garlic powder), a little pinch of dried oregano, and a little pinch of cumin to the pot.
  4. Stir to combine and cover pot. Cook rice for 35-40 minutes.
  5. Fluff rice and enjoy!

Questions About Making Rice

Raw white rice in a bowl.

What is the Ratio of Water to Rice?

If you’re making long-grain white rice on the stove or in the Instant Pot, use 1 1/4 cup of water for every cup of rice.

If you’re making brown rice on the stove, use 1 cup of water for every cup of rice. If you’re making brown rice in the Instant Pot, use 1 1/4 cups water for every cup of rice.

What Does It Mean to Fluff Rice?

Fluffing rice just means running a fork or a rice paddle through the rice after it’s finished cooking and while it’s still in the pot to break up the big clumps of rice and make it fluffy for scooping.

Do You Season Rice Before or After Cooking?

Fresh or dried herbs should be added to your rice after it finishes cooking. For salting rice, make sure to do this to the water before adding your rice to your pot.

How Do You Make Rice Taste Good?

  • Use chicken or veggie broth instead of water
  • Use canned coconut milk instead of water
  • Add in fresh or dried herbs
  • Add in chopped cilantro and fresh lime juice
  • Drizzle a bit of soy sauce on top
  • Add a pat of butter or a drizzle of olive oil to the pot

Troubleshooting

There was a lot of extra water in the pot after the time was up. What should I do?

Drain off a bit of the extra water using a fine-mesh strainer and return the rice to the pot, but don’t put the lid back on the pot. Continue to cook the rice over very low heat until the rice is fluffy and the excess moisture is gone. Keep an eye on it though and watch for the rice drying out.

My rice always bubbles over when I cook it on the stove. Help!

A couple things to try here! Your stove temp could be a bit too high – just turn it down a crank to an extra low simmer setting. Your pot could also be too small for the amount of rice you’re cooking, so we’d recommend sizing up to help prevent this.

I went a little overboard with the salt and now my rice tastes too salty. Can this be saved?

Sure can! Make another batch of rice, but don’t salt the water. Cook the rice according to the instructions above. Once the rice is finished cooking, combine the salted and the unsalted rice. Boom! Rice crisis averted!

Why is my rice extra sticky and/or mushy?

A couple ideas why this might be happening! It’s possible you used too much water here. When you’re rinsing your rice, make sure to “squeeze” out some of the extra rinsing water or this will affect how your rice cooks. One other idea is, if you’re making white rice, double-check that you’re using long-grain white rice. The shorter the rice grain, the stickier the rice gets typically.

Our Favorite Ways To Enjoy Rice


How else are you loving to eat rice these days? Tell us, tell us, tell us!

The post How To Cook Perfect Rice appeared first on Pinch of Yum.


from Pinch of Yum https://ift.tt/3Dq62lg

Wednesday, August 25, 2021

Spaghetti with Crispy Zucchini

Spaghetti with crispy zucchini covered in melted cheese and fresh herbs in a bowl with a fork.

Hi-ho! It’s crispy zucchini spaghetti day, which means a big happy plate of steamy, twirly, saucy spaghetti (nothing too fancy here) piled high with roasty zucchini pieces surrounded by crispities of golden panko layered with a blanket of melted cheese and some bits of fresh basil.

It’s crunchy, summery, gardeny, cheesy in whatever way you want it to be cheesy (goat cheese, anyone?), steamy and satisfying, and totally perfect for a very hungry night because spaghetti doesn’t let us down.

Also: it’s very SOS-able.

We’ve been a part of a CSA this summer, which has been delicious and super fun for my toddler who loves the mystery of finding out “what’s in the box” week after week. It has also taken my relationship with zucchini to new heights. I practically need a new zucchini recipe every single day in order to keep up with the amount that we’re getting in our CSA boxes each week, and me and my zucchini are really progressing on our journey together.

One of our favorite ways to eat zucchini this summer has been zucchini fries or zucchini chips, and so you can understand that it was only just a matter of time until things evolved into a faster, lower maintenance, highly-delicious pasta-based way to eat more zucchini.

Can every day be crispy zucchini spaghetti day?

Roasted zucchini covered in breadcrumbs, melted cheese, and fresh basil on a baking sheet.

Because zucchini slices laced with crispy panko, Italian seasoning, Parmesan, garlic powder, and some lemon zest and blanketed under a bubbly little cheese quilt just sort of takes on a life of its own.

*grabs a piece hot off the pan*

*grabs another piece*

*and a few more*

A Very SOS-Friendly Ingredient List

Everything on your ingredient list is likely already in your pantry:

  • spaghetti
  • store-bought spaghetti sauce
  • zucchini
  • panko
  • egg
  • Italian seasoning
  • any cheese for topping, like Mozzarella for the melty goodness, or goat cheese for the creamy tang
Spaghetti with crispy zucchini in a bowl with melted cheese and fresh basil on top.

How To Make Spaghetti with Crispy Zucchini

To make this happen you’re going to have two main spots you’re working on (and I use the term “working on” very loosely):

  1. Your pasta pot (boil spaghetti / mix with sauce)
  2. Your sheet pan (toss zucchini with panko and spices, bake until yummy)

And with minimal effort, look at what you’re eating for dinner: a hot, twirly bowl of spaghetti loaded high with cheesy zucchini crispities and fresh basil. Add some extra lemon juice or red pepper flakes to wake it all up and this is not a sad dinner situation.

I have lost track of how many times my husband AND my toddler have gone back for seconds on this. The table just falls silent in delight as we slurp, twirl, and crunch, which, in my life right now, is the best kind of SOS dinner.

Close-up of spaghetti with crispy zucchini in a bowl with melted cheese and fresh basil on top. A fork is in the bowl twirling the spaghetti.

Spaghetti with Crispy Zucchini: FAQs

Yum! How can I make this gluten-free?

Just sub your favorite gluten-free pasta and use gluten-free breadcrumbs.

Can I add meat to this?

Sure can! Some delicious store-bought meatballs would be a really SOS-friendly option here.

Does this save well as leftovers?

The zucchini might not stay as crispy as when you first make it, but if you’re still rocking that work-from-home life, you could pop the zucchini crispities in the oven to reheat for a few minutes the next day and pop them on top of your noodles.

Print

Spaghetti with Crispy Zucchini


  • Author: Lindsay
  • Prep Time: 15 minutes
  • Cook Time: 30 minutes
  • Total Time: 45 minutes
  • Yield: 4 servings

Description

This Spaghetti with Crispy Zucchini is the perfect end-of-summer song! It doesn’t get much better than fresh summer zucchini coated in a crispy, cheesy breading piled high on top of spaghetti with fresh herbs. YUM! 


Ingredients

Units
  • 1/2 pound of uncooked spaghetti
  • a jar of your favorite store-bought spaghetti sauce (I usually use about 2/3rds of a jar)
  • 1 zucchini, cut into 1/4 inch-thick rounds (about 23 cups)
  • 1 egg
  • 1 cup panko breadcrumbs
  • 1/2 cup grated Parmesan cheese (optional)
  • 1 tablespoon lemon zest (optional)
  • 1 teaspoon salt and pepper to taste
  • 1 teaspoon Italian seasoning
  • 1/2 teaspoon garlic powder
  • some kind of cheese – I like shredded mozzarella and provolone, but fresh mozzarella slices are great and goat cheese is also amazing
  • fresh basil leaves for topping

Instructions

  1. Cook the spaghetti according to package directions. Drain and toss with sauce. I like to add extra olive oil, salt, and pepper to taste to just kick things up a notch.
  2. Preheat the oven to 400 degrees. Beat the egg in a large bowl; add zucchini and toss to coat. Add panko, Parmesan, lemon zest, and spices. Toss to coat as much as possible. Transfer to a baking sheet – arrange the zucchini with some space between, and spoon the crispity crumbles on and around the zucchini. Drizzle with olive oil. Bake for 15-20 minutes until nice and golden brown.
  3. Remove pan from the oven. Sprinkle with your cheese of choice and return to bake or broil for a final 5 minutes. Top with fresh basil leaves, more olive oil, red pepper flakes, etc. 
  4. Serve the spaghetti in deep pasta bowls topped with a scoop of cheesy crispy zucchini and more fresh basil. Mwah. 
  • Category: Pasta
  • Method: Stovetop
  • Cuisine: Italian-Inspired

Keywords: zucchini recipe, spaghetti, spaghetti and zucchini

Recipe Card powered by Tasty Recipes logo

More Zucchini Recipes To Close Out Summer

The post Spaghetti with Crispy Zucchini appeared first on Pinch of Yum.


from Pinch of Yum https://ift.tt/3sHL5gY

Monday, August 23, 2021

Garlic Butter Shrimp Boil

Shrimp boil on a sheet pan with garlic butter. The garlic butter is in a bowl with a spoon and there's corn, lemon wedges, shrimp, and kielbasa on the sheet pan with potatoes.

Hello! Here is what I think we should do:

Boil shrimp, summer sweet corn, baby red potatoes, and kielbasa sausage in a big pot.

Drain it all out and pour onto a table, platter, or big roasting pan.

And now drizzle, dunk, and double dunk them all in butter infused with garlic and thyme.

Thank you and goodnight!

This recipe could not be easier. You can make it more elaborate if you want! Because a shrimp boil is a thing of beauty and shows so much variety and character depending on how you do it and please, by all means, take this as your idea springboard and go do something creative or impressive or regionally specific. We will love you for it.

But if you’re looking for less of a full-blown elaborate meal and more of a quick-and-fun dinner solution, and/or you live in a non-coastal state such as… Minnesota (lol), this can still work! This can work beautifully.

Ingredients for a shrimp boil laid out on a table. There is a purple bubble over each ingredient with the ingredient name in the purple bubble.

SOS Ingredients, Anyone?

Here’s what we’re looking at for ingredients:

  • shrimp
  • potatoes
  • kielbasa
  • corn
  • spices (Old Bay, anyone? Cajun spice mix will also do)
  • lemon
  • butter

Throw some garlic from the pantry into your butter bath, and maybe a few sprigs of thyme, and you are looking at a REALLY DELICIOUS weeknight dinner that feels fun, saucy, and deliciously outside of the box.

Normally I’m just serving this to myself, my husband, and my toddler, and maybe a friend who happened to stop by, but even with my humble little homegrown crowd, it never fails to put stars in people’s eyes when you bring this out to the table and set it down with extra-dramatic flair.

The butter-drizzled juicy shrimp, steamy corn and potatoes, and the luscious little side dishes of garlic butter for extra dunking is a hungry food-lover’s delight.

Corn, shrimp, onions, and kielbasa sausage on a platter for a shrimp boil.

The Idea Behind This Shrimp Boil

The idea of a shrimp boil came into my life when I was at a cabin this summer and my sister, who has 4 young kidlets (bless her), made dinner for my entire family of 18+ people without even breaking a sweat. What did she make? A SHRIMP BOIL.

She told me that she makes it all the time at home because it’s super easy (boil everything and drizzle with butter) and her whole family loves it.

And at that point I was like, why haven’t I been doing this for my whole life.

I promptly went home and bought some Cajun seasoning and a container of Old Bay and got to work infusing my melted butter with thinly sliced garlic and a few sprigs of thyme. Why oh why oh why is it so good?

A shrimp boil on a sheet pan with garlic infused butter. A white hand is sprinkling Old Bay seasoning on top.

Source notes: According to Lobstergram, “while there’s no exact date of origin that we know of to place when seafood boils started, it’s safe to say that with the arrival of Cajun people from Maritime regions of Canada in the 1700’s, one of the culinary traditions they brought with them was the seafood boil.” Seafood boils are generally a Coastal food experience, but I’m bringing the coast to Minnesota today! 🙂 The type of seafood, the sides, and the style of preparation are dependent on the region, but in general, the concept of a shrimp or seafood boil is a communal event similar to a barbecue or a potluck. My sister initially gave me the idea for this recipe as a way to make a quick and easy dinner for a large group, as she does for her family, and then I watched this video from Joshua Weissman more about the variations and super foodie details that can go into a shrimp boil, which inspired me to add a few extras to her basic version. And where we ended is somewhere between the two – a delicious, low-key, memorable, keep-coming-back-for-more shrimp boil that tastes best when shared with family and friends.

Print

Garlic Butter Shrimp Boil


  • Author: Lindsay
  • Prep Time: 15 minutes
  • Cook Time: 20 minutes
  • Total Time: 35 minutes
  • Yield: 4-6 servings

Description

Can you handle this Garlic Butter Shrimp Boil? We’re talking butter-drizzled juicy shrimp, steamy corn and potatoes, and luscious little side dishes of garlic butter for extra dunking. YUM!


Ingredients

Units

Shrimp Boil

  • 1 pound small potatoes (for the best flavor I recommend cutting in half or quarters so the insides of the potato can absorb the sauce)
  • 24 ears of corn, cut into small pieces
  • 1 pound kielbasa sausage, sliced
  • 1 pound shrimp
  • and any random things you have on hand that can make a very low key broth: onion, garlic, lemon, Cajun seasoning, salt – but I’ve boiled it with just water, too, and that will work!

Sauce:

  • 2 sticks of salted butter (you don’t have to use it all! my motto for garlic butter sauce is better too much than not enough)
  • 56 large cloves garlic, thinly sliced
  • thyme sprigs (optional)
  • lemon wedges
  • Old Bay or Cajun-style seasoning

Instructions

  1. Butter Sauce: Melt your butter in a saucepan over medium low heat. Add the garlic and just let it hang out over gentle, low heat to infuse all the garlic flavor into the butter and soften the little pieces of garlic. Add a few thyme sprigs if you want to be extra. Keep an eye on it so you don’t brown it or burn it. It will smell… how do I say this? AMAZING.
  2. Start Your Water / Broth: Fill a large (like, large) pot with water to about half capacity. Bring the water to boil over medium high heat. If you want, add some things to make a broth: chunks of onion, garlic, lemon, salt, seasonings. Add a couple big pinches of salt. This is very low pressure and meant to be loose! Plain salted water will also work just fine.
  3. Boil Potatoes and Corn: Add potatoes and corn to the water. Boil for 5-8 minutes until tender-crisp.
  4. Boil Kielbasa and Shrimp: Add kielbasa and shrimp to the water. Boil for another 4-5 minutes until the shrimp is cooked through.
  5. Serve: Drain and transfer to a big roasting pan, serving dish, OR directly to your table lined with newspaper for the real deal experience. Squeeze lemon juice over the top, sprinkle with seasonings to taste, and drizzle with the butter sauce. Also: serve with little dishes of garlic butter sauce for dunking. Be prepared to fall in love.
  • Category: Dinner
  • Method: Boil
  • Cuisine: Cajun

Keywords: shrimp boil, cajun shrimp, shrimp recipe

Recipe Card powered by Tasty Recipes logo

The post Garlic Butter Shrimp Boil appeared first on Pinch of Yum.


from Pinch of Yum https://ift.tt/3sEwy5C