Monday, October 30, 2023

5 Ingredient Tomato Soup

Dipping garlic bread into a bowl of tomato soup.
This recipe is sponsored by DeLallo.

This tomato soup is… honestly everything right now! It’s made with 5 ingredients – modeled after the iconic Marcella Hazan tomato sauce recipe!

I’ll never say no to a bowl of tomato soup with a hot and crusty, buttery, salty piece of garlic bread, or a grilled cheese, and this one is so simple that there is no good reason you shouldn’t make it for dinner immediately.


5 Ingredient Tomato Soup


Lindsay’s Notes

Dipping garlic bread into a bowl of tomato soup.

This was one of the happiest things I ate in October.

I made the Marcella Hazan style pasta sauce for a pasta recipe, but when we were all sampling it in the office, Jenna said: “this actually reminds me of tomato soup!” And that comment really started me down a path of obsession. I started eating this as tomato soup instead of tomato sauce, and I realized that this is a total game-changer.

There was one day in particular where I came back inside from a chilly day hiking around with the girls (and by “hiking around” I mean basically walking at a snail’s pace, getting in and out of the stroller, picking up 100 acorns and admiring the colorful trees within a 3 block stretch), and I popped this in the Instant Pot, whipped up a batch of garlic bread, and just devoured it. It was maybe one of my favorite meals of 2023 – just the right thing at just the right moment.

We have a really awesome tomato soup already on Pinch of Yum, so I debated the necessity of having a second recipe here. But ultimately I decided they really serve two different moments.

  • Homemade Tomato Soup: This is the OG tomato soup on Pinch of Yum and if you’re looking for more of a showstopping tomato soup with complex layers of flavor, this is the one. This is like a fancy, ultimate, dress-to-impress type tomato soup.
  • 5 Ingredient Tomato Soup: And now this is this one, the new addition to the family, is all about simplicity. It tastes like, honestly, just tomatoes. And butter. And a little onion, a little garlic, but mostly just tomatoes. It’s minimal, classic, extremely easy but also… rich, luscious, and lovely. No extra bells and whistles, just a simple buttery tomato flavor.

I know grilled cheese is the iconic pairing for tomato soup, and while we have done that several times this fall (waffled grilled cheese with squishy white bread, don’t @ me), the garlic bread + tomato soup combo is really underrated and absolutely worthy of consideration.

That crusty golden texture, the crispity, buttery chew on the bread, the fresh garlic herb flavor, and the smooth tomato soup – it’s like they were made for each other.


How To Make This Easy Peasy Tomato Soup

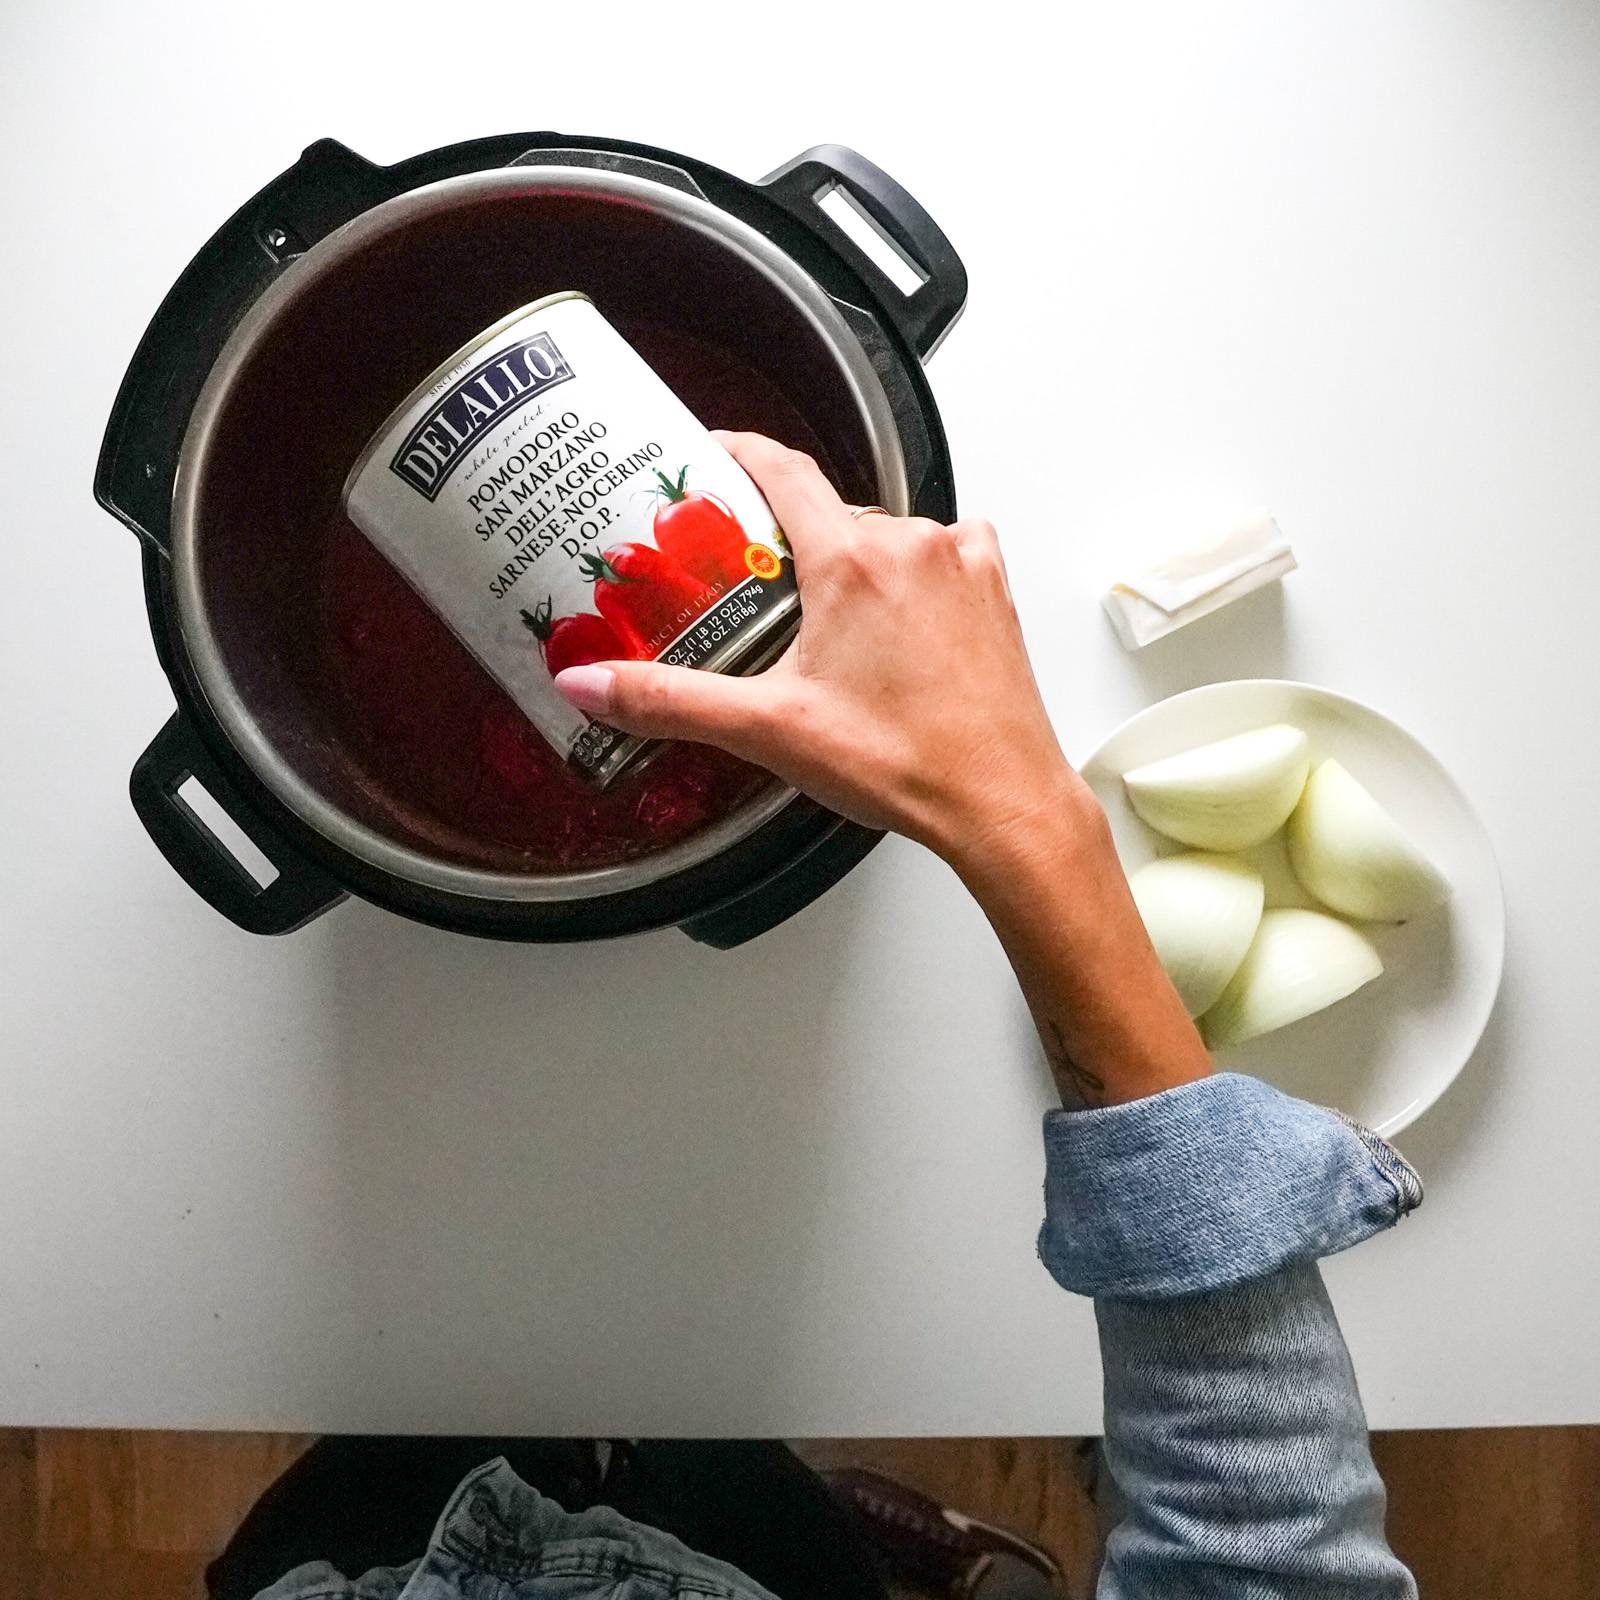
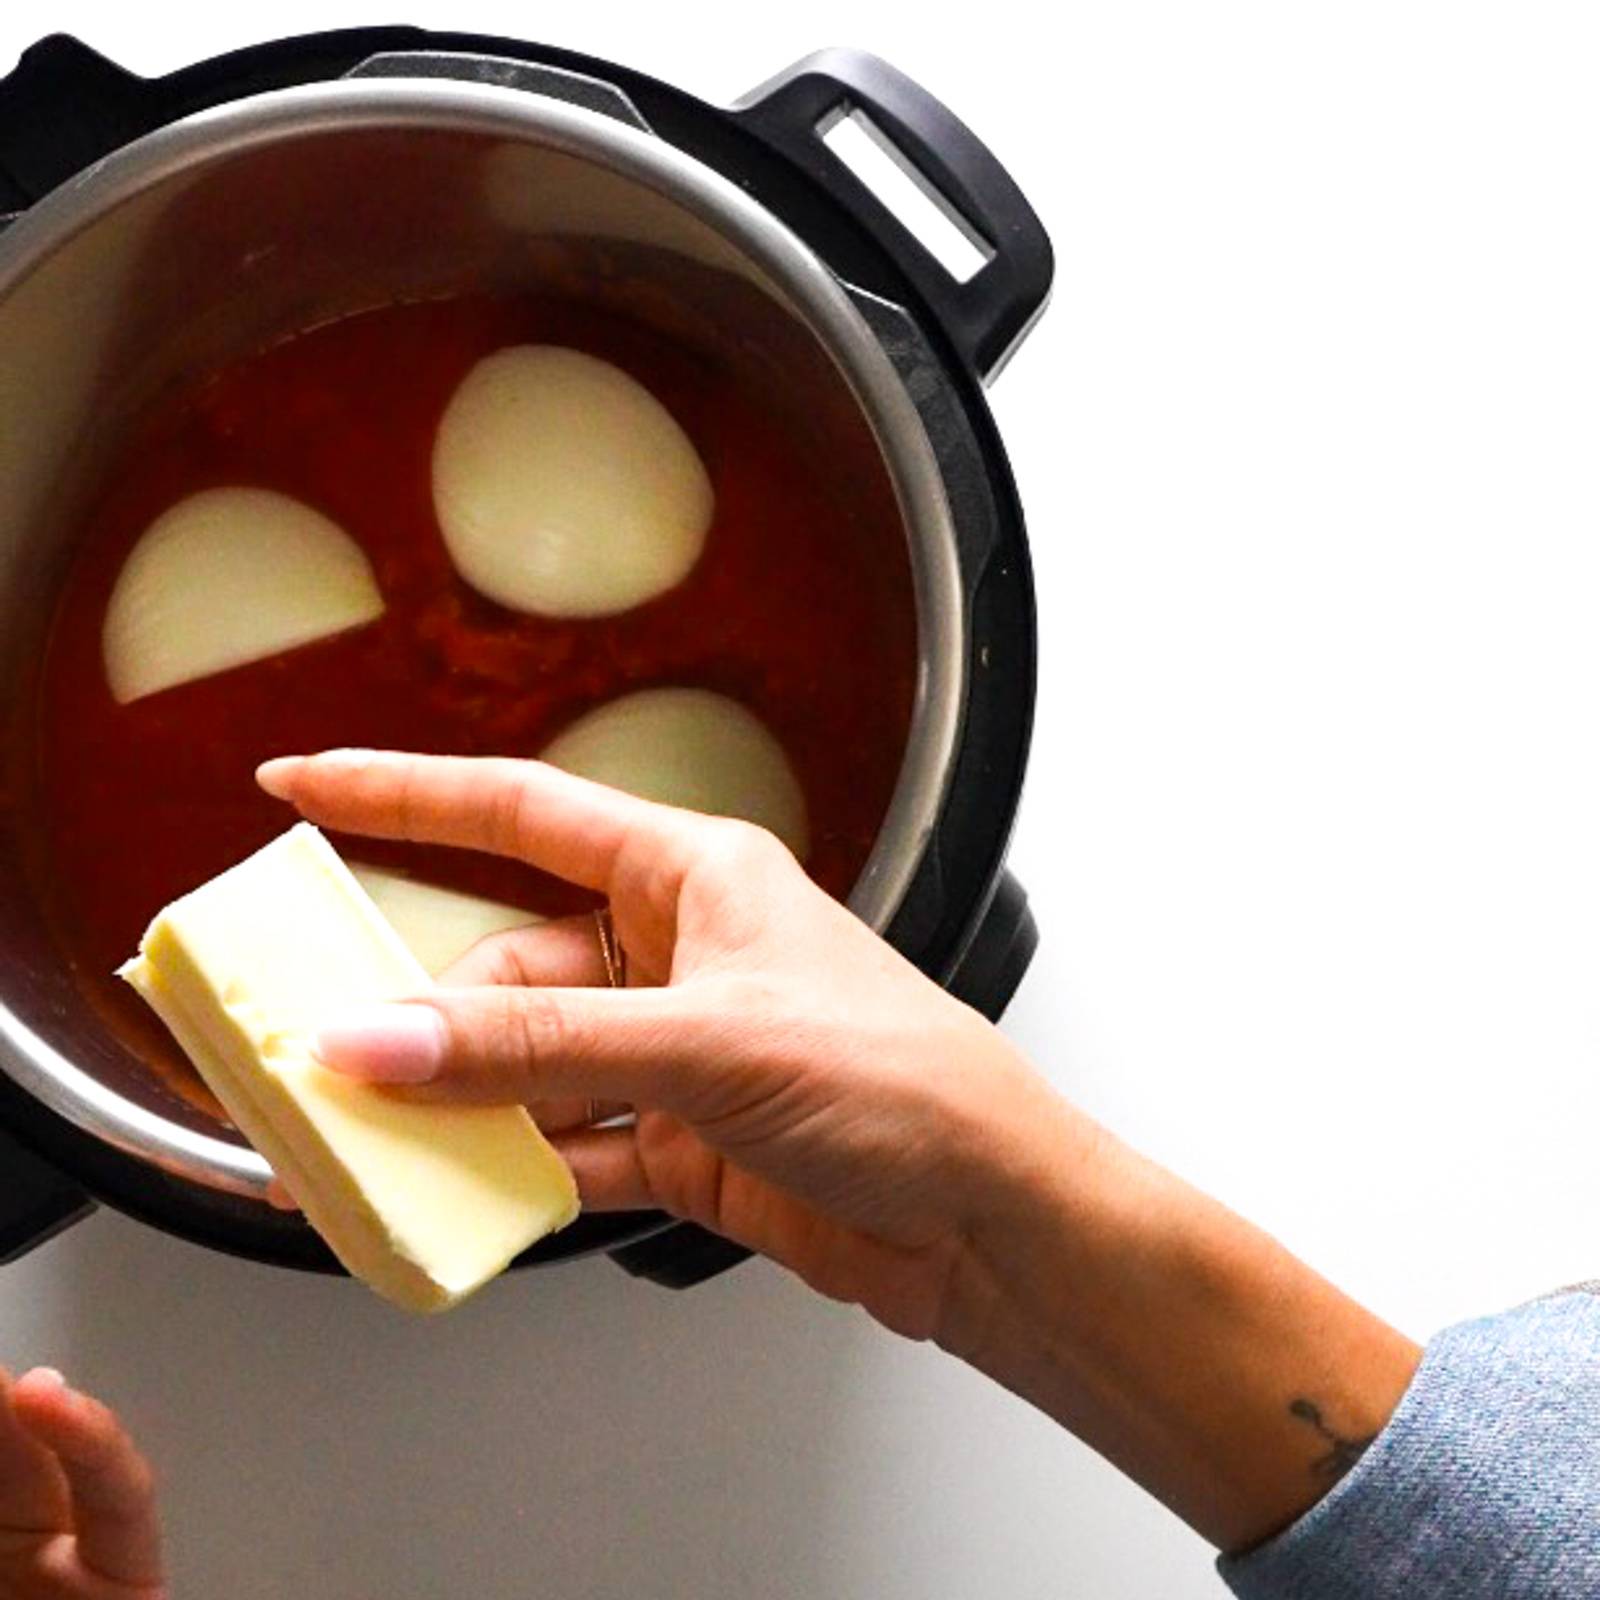
Step 1: Add everything to a pot.

  • Canned San Marzano tomatoes,
  • onion chunks,
  • and butter! THAT’S IT!

I use DeLallo San Marzano tomatoes – we love DeLallo and have been preaching this for years. They have the best products ranging from pastas to sauces to canned tomatoes, many of which are imported from Italy. They set such a high bar for quality.

Pouring can of San Marzano Tomatoes into an Instant Pot.

In addition to the tomatoes and butter, a pinch of salt goes in there, too. And sometimes I add a few smashed garlic cloves. Hence the “5 ingredient” title.

(I’m showing this in the Instant Pot, but you can also do this in a large Dutch oven on the stovetop.)

Adding stick of butter to Instant Pot with onions in tomatoes.

Step 2: Cook it all up for a while; then remove onion chunks.

After cooking, pull those onion chunks out. We’re just infusing the flavor!
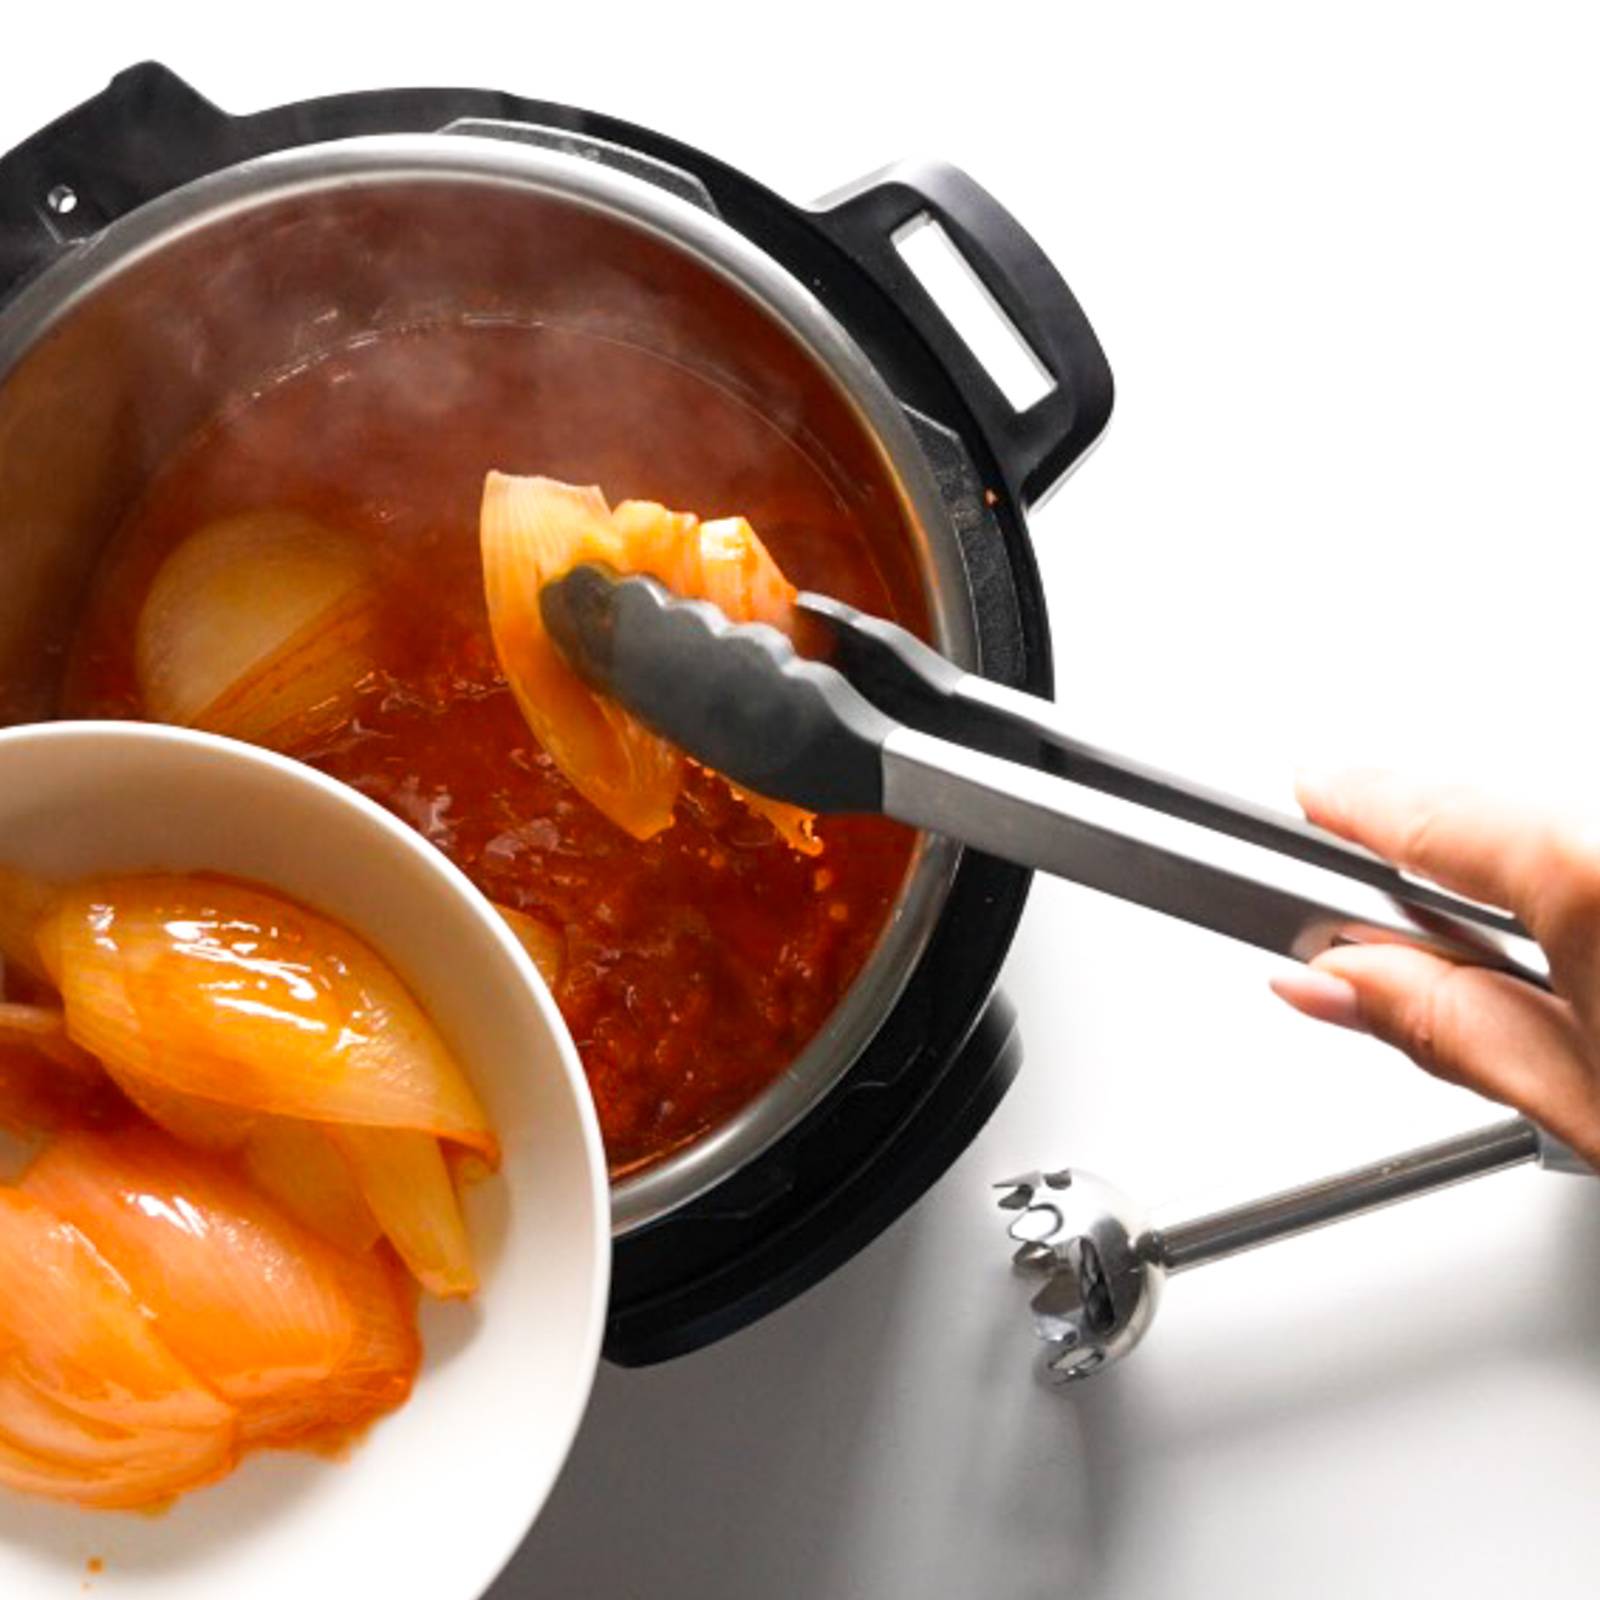
Removing cooked onions from the Instant Pot.

Step 3: Blend!

I use an immersion blender to blend directly in the pot. The butter gets emulsified, which makes it just a little creamy, and the whole thing is luscious, velvety, simple and delightful.

Blending tomato soup with an immersion blender.

Can you believe it? That’s it. You’re done.

Enjoy, and I mean really, ENJOY this cozy moment. ♡


Watch How To Make This Tomato Soup

Print
A picture of 5 Ingredient Tomato Soup

5 Ingredient Tomato Soup


  • Author: Lindsay
  • Total Time: 50 minutes
  • Yield: 4-5 servings

Description

A simple 5 ingredient tomato soup made with butter, onion, and canned San Marzano tomatoes. Based on the Marcella Hazan tomato sauce recipe. This hits the cozy vibes just right.


Ingredients

Units

5 Ingredient Tomato Soup:

  • 2 28ounce cans San Marzano tomatoes (whole or crushed will work – I usually use whole tomatoes, and we use the DeLallo brand!)
  • 1 stick (8 tablespoons) salted butter
  • 1 yellow onion, peel removed and cut into 4 chunks
  • 34 cloves smashed garlic (optional)
  • 1 1/2 teaspoons salt

Instructions

  1. Make the Tomato Soup: Put the tomatoes, butter, and onion in a large saucepan or Dutch oven. Bring it up to a low bubble, then turn the heat to medium low. Cover partially with a lid; let it simmer for 45 minutes. Stir every 15 minutes or so to prevent scorching on the bottom.
  2. Remove Onion Chunks: Remove the onion pieces using tongs. I leave the garlic in there, but that’s up to you!
  3. Blend the Tomato Soup: Using an immersion blender, blend up the soup until it’s a smooth as you want it. Taste and adjust; you can thin it out with milk, water, broth, cream, whatever you want; I just leave it as-is!
  4. Serve: Serve tomato soup with garlic bread, grilled cheese, croutons, crackers, pesto, whatever you like! 

Notes

To make this in the Instant Pot: Everything goes in the pot, cook for 20 minutes, and release pressure. Remove onion chunks and blend! The advantage of this method is that you don’t have to babysit it – you can just leave it alone and it won’t burn. Very hands-off. That said, I feel like the flavor of the stovetop version is just slightly sweeter and richer because you get a bit more caramelization, but both methods are amazing.

  • Prep Time: 5 minutes
  • Cook Time: 45 minutes
  • Category: Soup
  • Method: Stovetop
  • Cuisine: American

Keywords: tomato soup, easy tomato soup, instant pot tomato soup, san marzano tomatoes

Recipe Card powered by Tasty Recipes logo

Frequently Asked Questions For Tomato Soup

What can I use instead of San Marzano tomatoes?

Whole peeled canned tomatoes would also work! The benefit of San Marzano tomatoes is that they’re considered the highest quality and are prized for their thick flesh, sweet flavor, and lower seeds and lower water content.

How long do the leftovers last?

I keep this in the fridge for as long as a week, and it also freezes really well, so you can save this for a long time.

How can you add more protein to this meal?

I would make a grilled cheese with some protein on there to go with the soup – like a chicken or turkey panini.

Is tomato soup dairy free?

This tomato soup can easily be dairy free if you use dairy free butter! There are many great dairy free butters out there – I like Miyokos brand! You could also use olive oil (1/2 cup) in place of the butter.

Can you make this in the slow cooker?

Yes, I think it would work great in the slow cooker. I would cook it on low for 6-8 hours or high for 3-4 hours. Follow all the other same instructions.

Three Of My Favorite Cold-Weather Soups


Thanks to DeLallo for sponsoring this recipe!

The post 5 Ingredient Tomato Soup appeared first on Pinch of Yum.


from Pinch of Yum https://ift.tt/NdblOhs

Friday, October 27, 2023

House Favorite Garlic Bread

I mean, you can make what you want for dinner, but what gets people excited is the garlic bread.

This is our house favorite garlic bread, the one I make almost weekly at this point – it’s generous with the butter and Parmesan, solidly garlicky, and flecked with herbs to really make it pop. It’s classic, it’s versatile, and it’s so ridiculously good.


Why I Love This Garlic Bread

Garlic bread is something that I’ve spent a stupid amount of time thinking about over the last 2-ish years.

We did a soup series a few years ago, and I was thisclose to posting a garlic bread recipe in the series, but I never quite locked it in. I just could never commit to a certain type of bread, or a particular texture, or just a general look and feel. Do we want it crusty? Chewy? Hearty? Or light and toasty?

A few years and many batches of garlic bread later, and I think I’ve landed. And we are garlic bread happy over here.

This is the house favorite garlic bread at the Ostrom household these days – beautifully springy French bread as the base, generously slathered with butter and Parmesan, appropriately garlicky but not overdone (and important balance, even for garlic bread), and flecked with bits of fresh herb to just elevate the eating experience.

The end result is golden brown, buttery and savory, with a satisfying bite and chew to it while at the same time staying toasty and light. It makes for elite dipping, sopping, and scooping, which is a top quality for me when it comes to garlic bread.

Another important quality: this is fast. In our house, garlic bread is usually a bonus meal item (served with spaghetti, soup, etc.) in which case I’m willing to give it 15 minutes of my life, but no more.

Current favorite way to eat this garlic bread: dunked in a rich tomato soup. I have an exceptionally easy, classically delicious one that I’m going to share soon. Stay tuned.


Ingredients For This Amaze Garlic Bread

There aren’t many! Yay!

  • French bread (more on that in a second)
  • Butter
  • Garlic (I use both fresh garlic and a pinch of garlic powder)
  • Parmesan cheese
  • Parsley

Which leads us to the most important decision one can make about garlic bread, I think.

What Type of Bread is Best for Garlic Bread?

This is something that I’ve spent a stupid amount of time thinking about, and all of it comes down to this:

What do you really want from your garlic bread?

We need to anchor its identity. Do you want it to sop up sauces? Do you want it to give you a hearty, crusty chunk that you can sink your teeth into? Do you just want it to be a vehicle for that Parmesan-laced garlic butter flavor? Is it standing on its own or coming alongside something else?

The two main breads that are easiest to think about for garlic bread, I think, are these two, which are labeled in the store as “French bread” and “baguette”.

I have made multiple rounds of this garlic bread on both types of bread, and they’re both delicious.

But ultimately I’ve found that I prefer French bread because it has a more even crumb with fewer holes, giving you a flatter surface area to spread the butter mixture and therefore a more even golden brown topping to your garlic bread.

French bread is on the lighter and fluffier side, which, to be honest, gave me pause. I generally like a really hearty bread that has some density, crunch, and chew to it. But after many many batches of this, I’ve actually really enjoyed the lightness of the French bread because it can kind of be both – it gets crunchy and chewy with the golden browning of the Parmesan on top, but it’s light enough to sop up whatever sauces and soups you’re eating it with.

I’ve also seen garlic bread made with challah, and sourdough, and ciabatta, and being that it’s garlic bread – I kind of don’t think you can go wrong. But if you’re asking me (and you are on my website!) in the year of our Lord 2023, I’m going with French bread.


How To Make This Garlic Bread

Step 1: Soften your butter.

I do this in the microwave, in short increments, and then whisk it to get it smooth-ish. Cutting it into uniform chunks (like the photo above) will help it soften at an even rate.

Step 2: Grate that garlic right in there.

My hot take: anything more than one clove is overpowering and generally unpleasant. Stop at one!

It doesn’t seem like it will be enough, but trust me. Even for me – a self-proclaimed garlic lover – one clove is plenty.

Step 3: Add Parmesan and parsley.

Finely grated Parmesan cheese is where it’s at! That savory flavor and golden browning – YUM.

I also like to add a little bit of garlic powder at this point just to slightly extend my garlick-ing of things (but with more subtlety than fresh garlic).

Step 4: Spread that amazingness on your bread.

I find this amount of butter mixture is good for half of a long loaf of French bread.

Really, really coat it. Layer it on. Be generous.

Step 5: Bake it!

If you don’t want any browning, first of all, why? It’s delightful. Second of all, you’ll just want go for more like 375 to 400 degrees.

If you like it a little golden brown, like I do, with a bit of texture on top, shoot for 10 minutes at 425 degrees.

Cut those halves into strips and get straight to the dunking!


Print
A picture of House Favorite Garlic Bread

House Favorite Garlic Bread


  • Author: Lindsay
  • Total Time: 3 minute
  • Yield: 5 servings (about 2 pieces per person))

Ingredients

Units
  • 1 stick (1/2 cup) salted butter, cut into chunks
  • 1 large clove garlic
  • 1/4 teaspoon garlic powder
  • 1/2 cup finely grated Parmesan cheese
  • 2 tablespoons minced fresh parsley

Instructions

  1. Preheat the oven to 425 degrees. 
  2. Soften the butter in the microwave in short increments. I like to whisk it to get it smoothed out a bit.
  3. Grate the garlic directly into the butter. Add the garlic powder, Parmesan, and parsley; stir to combine.
  4. Cut the French bread in half and spread with the butter mixture (this amount of butter is good for half of one large French bread loaf – see photos above).
  5. Bake for 10 minutes, adding 1-2 minutes for more browning.
  6. Remove from the oven, cut into slices, and serve. Life is good.
  • Prep Time: 5 miutes
  • Cook Time: 10 minutes
Recipe Card powered by Tasty Recipes logo

Three Recipes I Actually Can’t Live Without

The post House Favorite Garlic Bread appeared first on Pinch of Yum.


from Pinch of Yum https://ift.tt/KOuVbJH

Wednesday, October 25, 2023

Pumpkin Muffins with Maple Cream Cheese Filling

Pumpkin Muffins filled with cream cheese whipped cream.

HOLY. SMOKES. Pumpkin muffins are getting a lightly crunchy, sparkly cinnamon sugar topping, and then stuffed to the brim with maple cream cheese whipped cream. They are pure joy.

Part muffin, part cupcake, and part cream puff – in other words, a match made in heaven.


Pumpkin Muffins with Maple Cream Cheese Filling


Lindsay’s Notes

Bite shot of a pumpkin muffin filled with cream cheese.

These pumpkin muffins are exactly what I’ve needed these last few weeks: fluffy, joyful, distracting, unnecessary (but necessary), and comforting. (see also: this monkey bread)

I ate a cream cheese-filled pumpkin muffin from Caribou Coffee a few weeks ago, and that was the beginning of the end of this pumpkin muffin journey. Game over. It was SO good, and I was especially in love with the cream cheese layer – it wasn’t baked in, it was fluffy and light like a cream puff. Just injected right in the middle of the muffin.

And here we are now, making these at home. It feels wrong to call it a muffin, but calling it a cupcake isn’t quite right, either. Thankfully, I have full confidence that you’ll find the right moment to eat one of these: Saturday morning at home, holiday gathering, birthday party, football game. Midnight snack is also highly approved.

These muffins have been a delight and a joy in my life during these last couple crazy weeks. My girls have enjoyed sampling about 15 varieties of these as I worked them into exactly what I wanted them to be: fluffy, sparkly, just a tiny bit of crunch from the cinnamon sugar, and loaded (really, truly, LOADED) with fluffy whipped maple cream cheese.

I hope they bring a little bit of lightness and fun into your life this week!


How To Make These Pumpkin Muffins

Step 1: Make the muffins!

Standard pumpkin muffin material right here. I used these pumpkin muffins from Queen Sally of SBA – just changed the spices and the bake time instructions.

Scooping pumpkin muffin batter into a muffin tin.

Step 2: Make a cinnamon sugar topping.

This topping is minimal effort but adds a but of sparkle and crunch. I borrowed this topping from our Cinnamon Sugar Apple Cake, which is a good next stop once you’re done with these.

Mixing together brown sugar topping in a bowl.

Step 3: Bake the muffins.

House smells amazing at this point.

Finish baked muffins in a muffin tin.

Step 4: Make your whipped maple cream cheese filling.

This is a bit finnicky – don’t just throw it all in one bowl. Whip the cream cheese, whip the whipped cream, and then fold them together. Your efforts will be rewarded because THIS IS OTHERWORLDLY. This filling is borrowed from our Pumpkin Shortcakes with Cinnamon Apples, but just a bit more cream cheese forward.

Whipping together the cream cheese whipped cream in a bowl with an electric mixer.

Step 4: Cut a hole in the tops of the muffins.

You could also just skip this step and pipe your filling right in there, but this allows lots of room for lots of filling. Which is how I like it.

Plus, the extra little cone pieces are great for snacking and swiping into the extra cream cheese filling.

Cutting a hole into the muffins to fill with whipped cream.

Step 5: Pipe that filling right in there.

I use a little pastry bag, or a ziplock bag with the corner snipped off also works. Fill ‘er up!

Piping in cream cheese to Pumpkin Muffins.

And… you’re a bakery owner now. They’re beautiful.

Pumpkin muffins with cream cheese filling.

And super delicious.

Pumpkin muffins on a stack of plates.

Watch How To Make These Pumpkin Muffins

Print
Pumpkin muffins with cream cheese filling.

Pumpkin Muffins with Maple Cream Cheese Filling


  • Author: Lindsay
  • Total Time: 50 minutes
  • Yield: 12 muffins

Description

Pumpkin muffins are getting a lightly crunchy, sparkly cinnamon sugar topping, and then stuffed to the brim with maple cream cheese whipped cream. YUM. 


Ingredients

Units

Pumpkin Muffins:

  • 1/2 cup vegetable oil
  • 1/2 cup granulated sugar
  • 1/2 cup packed light brown sugar
  • 1 1/2 cups pumpkin puree
  • 1 teaspoon vanilla
  • 2 eggs
  • 1/4 cup milk
  • 1 3/4 cup all-purpose flour
  • 1 teaspoon baking soda
  • 1 1/2 teaspoons ground cinnamon
  • 1/4 teaspoon ground cloves
  • 3/4 teaspoon salt

Cinnamon Sugar Topping:

  • 1/2 cup granulated sugar
  • 1 teaspoon cinnamon
  • 1 tablespoon unsalted butter, melted

Maple Cream Cheese Filling:

  • 3/4 cup heavy cream
  • 8 ounces cream cheese, softened
  • 1/4 cup maple syrup (to taste)

Instructions

  1. Make Muffin Batter: Preheat the oven to 350 degrees. Whisk oil and sugars. Add pumpkin, vanilla, eggs, and milk; whisk until just combined. Add flour, baking soda, spices, and salt; mix until just combined. Pour muffin batter into an oiled or nonstick muffin tin, filling about 3/4ths of the way to the top of each up. 
  2. Make Cinnamon Sugar: Mix up the cinnamon sugar topping in a small bowl.
  3. Assemble and Bake: Spoon the cinnamon sugar over each muffin. Bake for 20-24 minutes, or until the tops spring back when gently pressed.
  4. Make Maple Cream Cheese Filling: Add the cream to a small bowl and beat until light and fluffy and stiff peaks form. In a separate bowl, beat the softened cream cheese until smooth. Fold in the whipped cream, using the beaters again to smooth it out if needed. Add the maple syrup and mix until smooth. 
  5. Fill The Muffins: Once the muffins have cooled, cut a cone out of the center of the muffins using a small paring knife. Using a piping bag, or a plastic bag with the corner snipped off, add the filling to the center hole in the muffins. Fill it all the way to the top (the filling will be exposed at the top – cute).
  6. Serve: These are ready to eat as-is! If making ahead, they should be stored in the fridge. They can be eaten at room temp or cold – both delicious!

Equipment

Notes

The little cone pieces make great little snackers! 

You’ll have extra filling – this is great for eating with the snack pieces, or dolloping on pancakes or waffles, or spooning over shortcakes, or topping a pie, just eating with a spoon out of the fridge. 

  • Prep Time: 30 minutes
  • Cook Time: 20 minutes
  • Category: Dessert
  • Method: Bake
  • Cuisine: American

Keywords: pumpkin muffins, pumpkin cream cheese, whipped cheese, cream cheese whipped cream

Recipe Card powered by Tasty Recipes logo

Three Of My Favorite Cozy Bakes

The post Pumpkin Muffins with Maple Cream Cheese Filling appeared first on Pinch of Yum.


from Pinch of Yum https://ift.tt/d5cQEe6