Monday, May 2, 2022

Italian Tomato and Bread Soup (Pappa Al Pomodoro)

Deep, unimpeded, sweet tomato flavor with swirls of garlic and rich velvety olive oil, bright fresh basil and, listen to this, your hunky crusty bread dips are already included! Make way for tomato and bread soup also known as pappa al pomodoro.

Spoon in bowl of tomato and bread soup

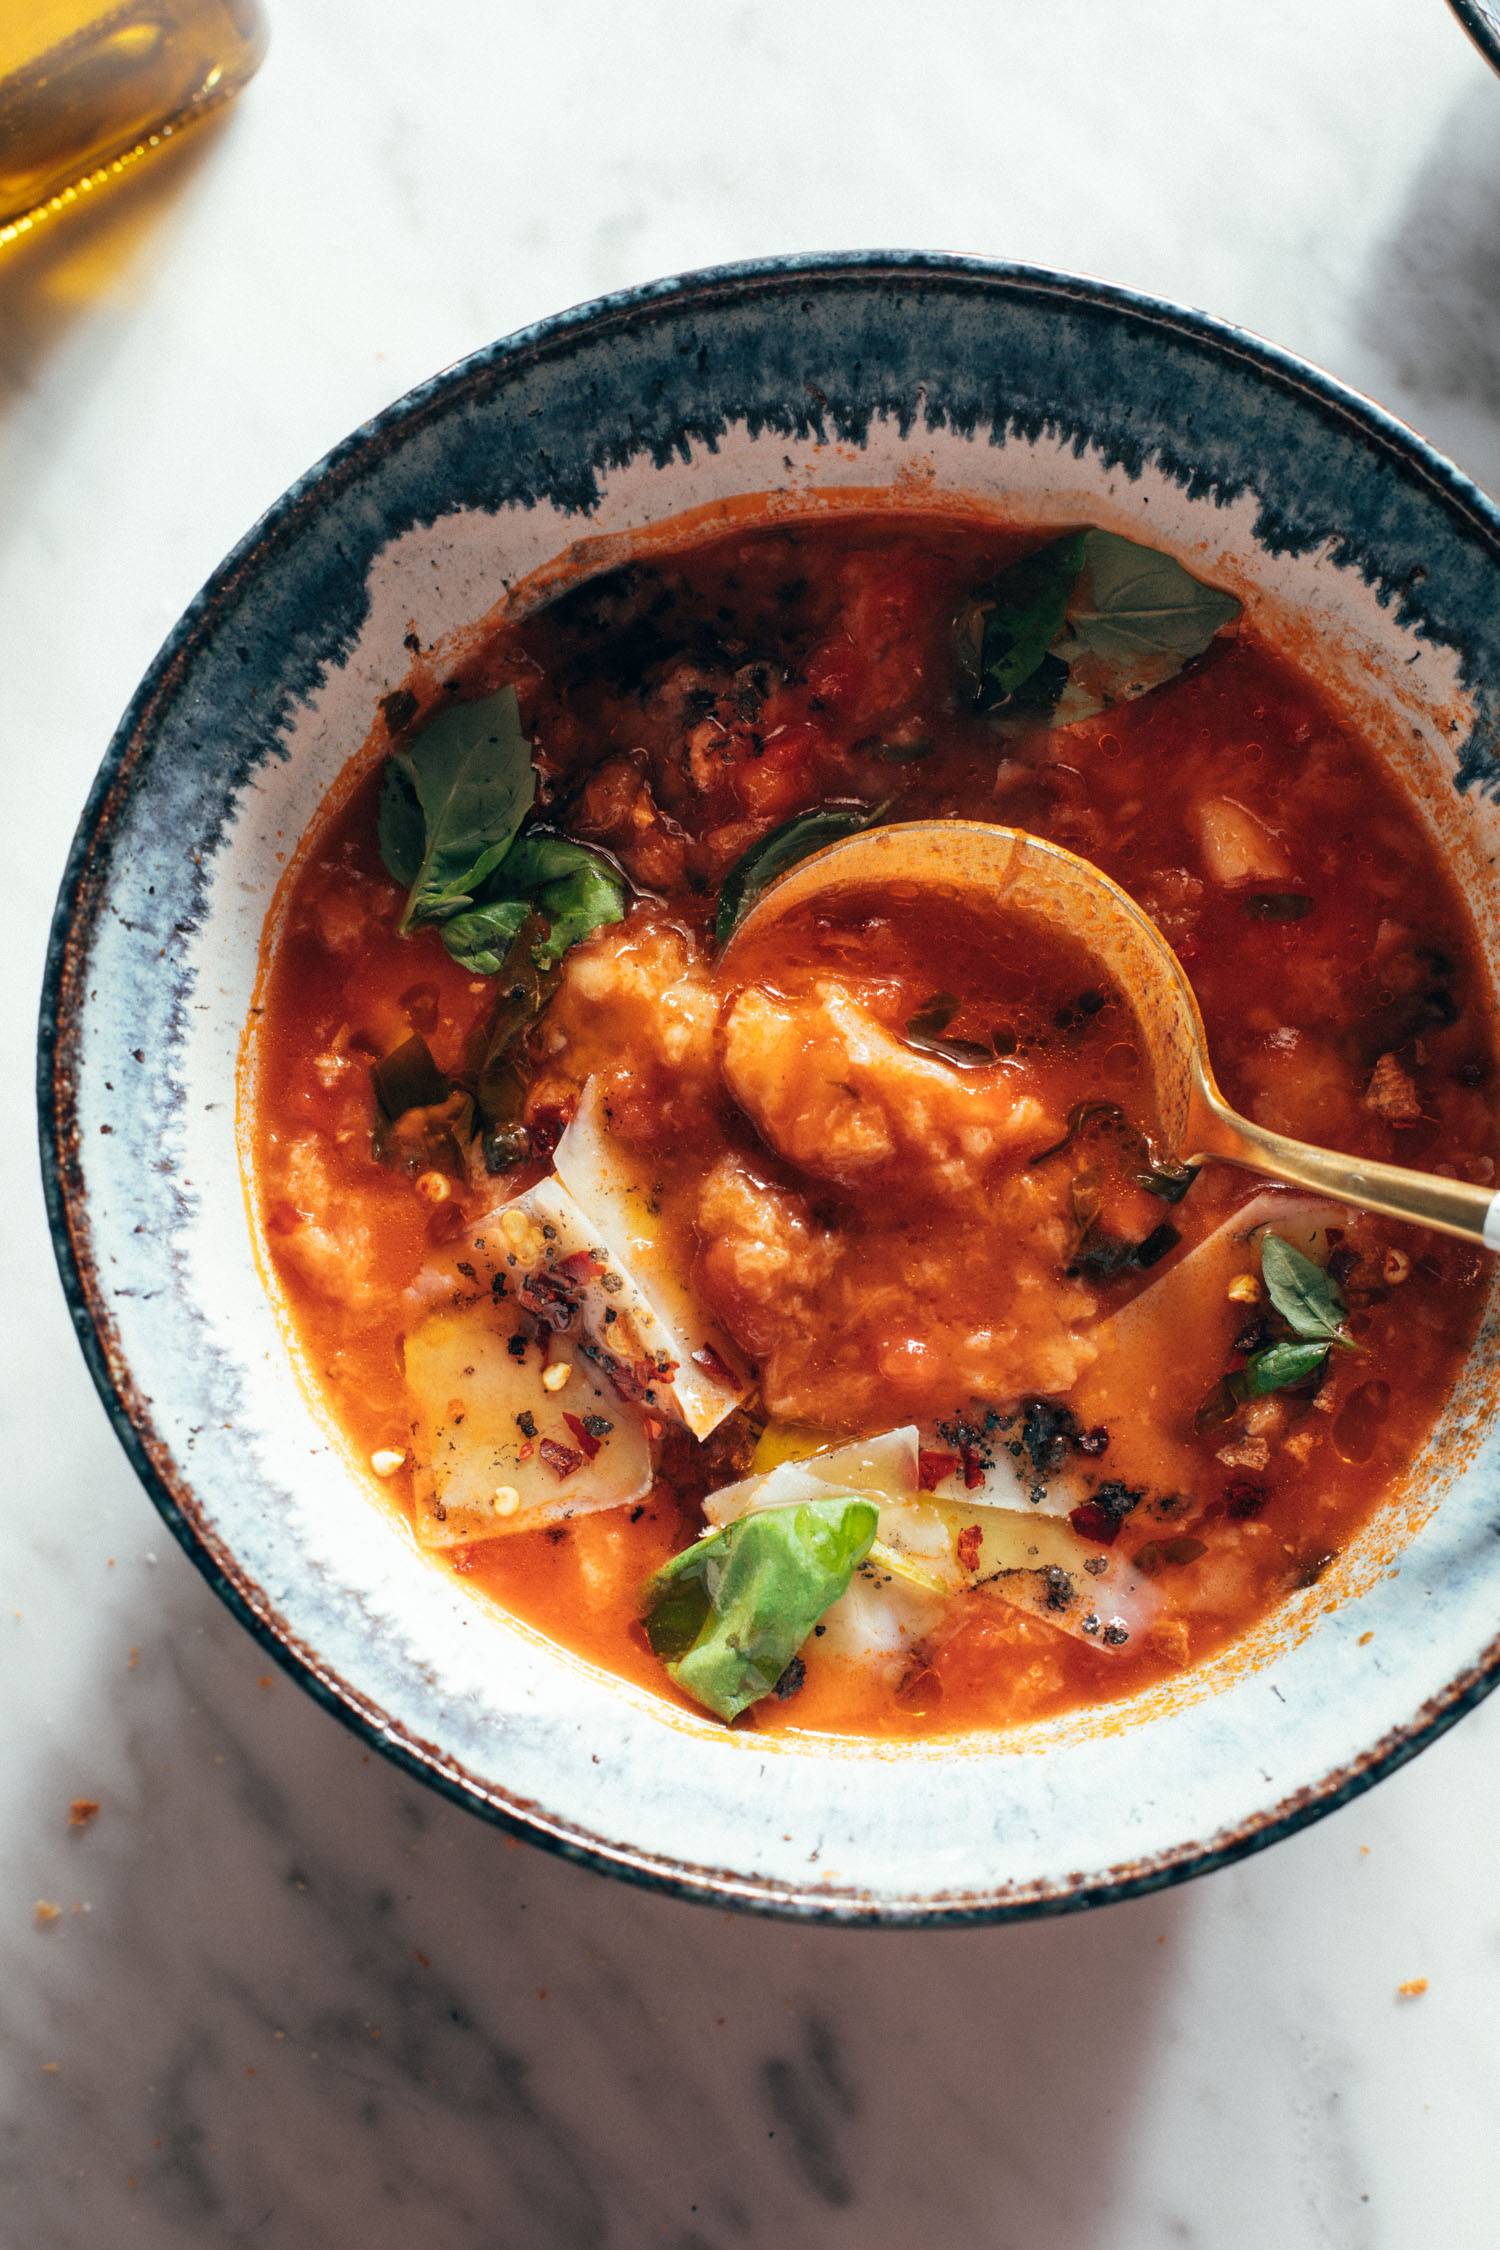
Pappa al pomodoro hails from the Tuscany region of Italy and is especially popular and fiercely claimed in Florence and Siena. It essentially translates to “tomato mush” and depending on where you have it and who is making it, it can range in texture from more of a porridge to a slightly thinner soup or stew consistency like we have here. But any way you have it, it is definitely all the yum. Just, all of it.

This recipe is from Marika Contaldo Seguso, an Italian cookbook author, and you can find her original pappa al pomodoro recipe in Milk Street.

In This Post: Everything You Need For Tomato and Bread Soup

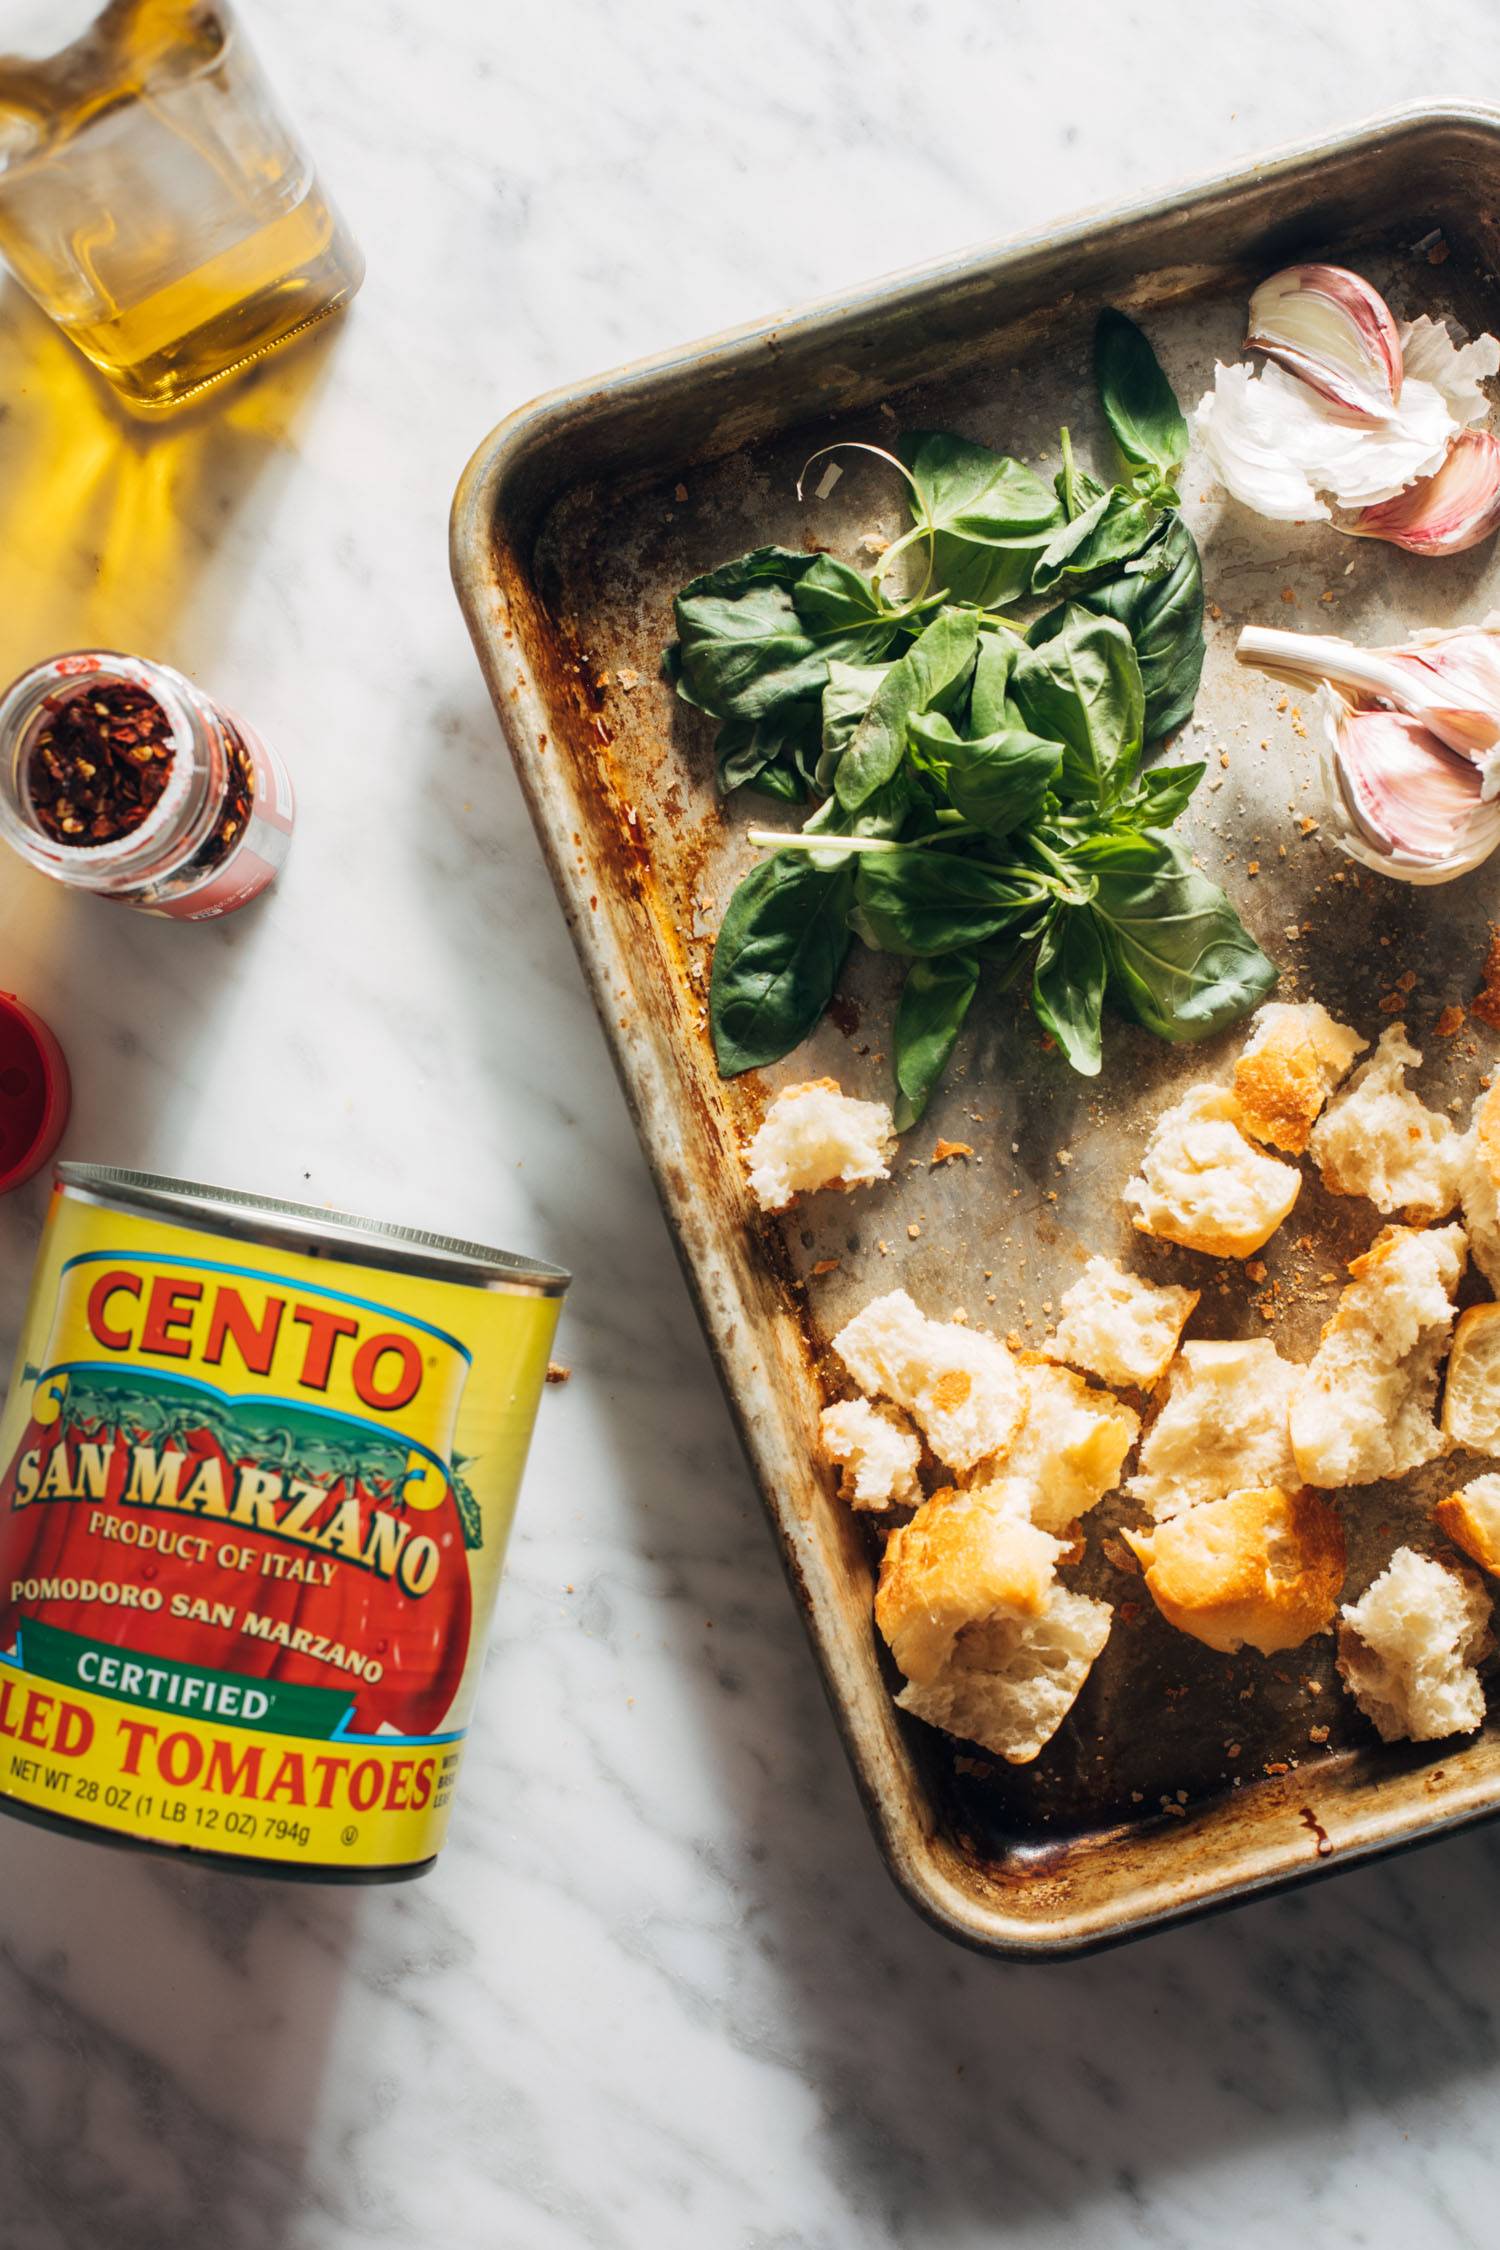
Ingredients We’re Working with For This Soup

The ingredient list for tomato and bread soup like this is always beautifully short, each flavor standing on its own. Here’s what you’ll need for this version:

  • canned whole peeled San Marzano tomatoes
  • dried or stale bread
  • extra virgin olive oil
  • garlic
  • fresh basil
  • vegetable/chicken broth

Because there are so few elements, you really want to use high quality ingredients to reach peak flavor. San Marzanos are delicious, fruit, and less acidic than other tomatoes. You’ll want really good extra virgin olive oil both for the soup and for the silky drizzles on top for serving. Fresh basil as opposed to dried here. And a good crusty white bread will do the trick.

Ingredients laid out for pappa al pomodoro

Let’s Make Pappa Al Pomodoro (Tomato and Bread Soup)

As mentioned, this recipe is a little thinner than a more traditional pappa al pomodoro but by all means, if you want to thicken it up, you can adjust the broth/bread ratio (or omit broth altogether and just let the tomatoes serve as the liquid) until it’s so thick your spoon stands up! Which, depending on where you are, can be the mark of a truly divine pappa in Italy. You could also thin it out if that is more pleasing! Our texture sweet spot was usually a one cup of broth per ciabatta roll ratio.

Here’s how we did this one:

  1. Tomatoes. Get your hands in there and crush!
  2. Garlic & Olive Oil. Sauté garlic in oil until fragrant and then add your crushed tomatoes and let simmer for a bit. Then add your broth & basil and keep simmering.
  3. Bread. Add dried bread to the tomato/broth mixture and simmer until the bread is soft. Then you can use a potato masher or whisk to keep breaking it down.
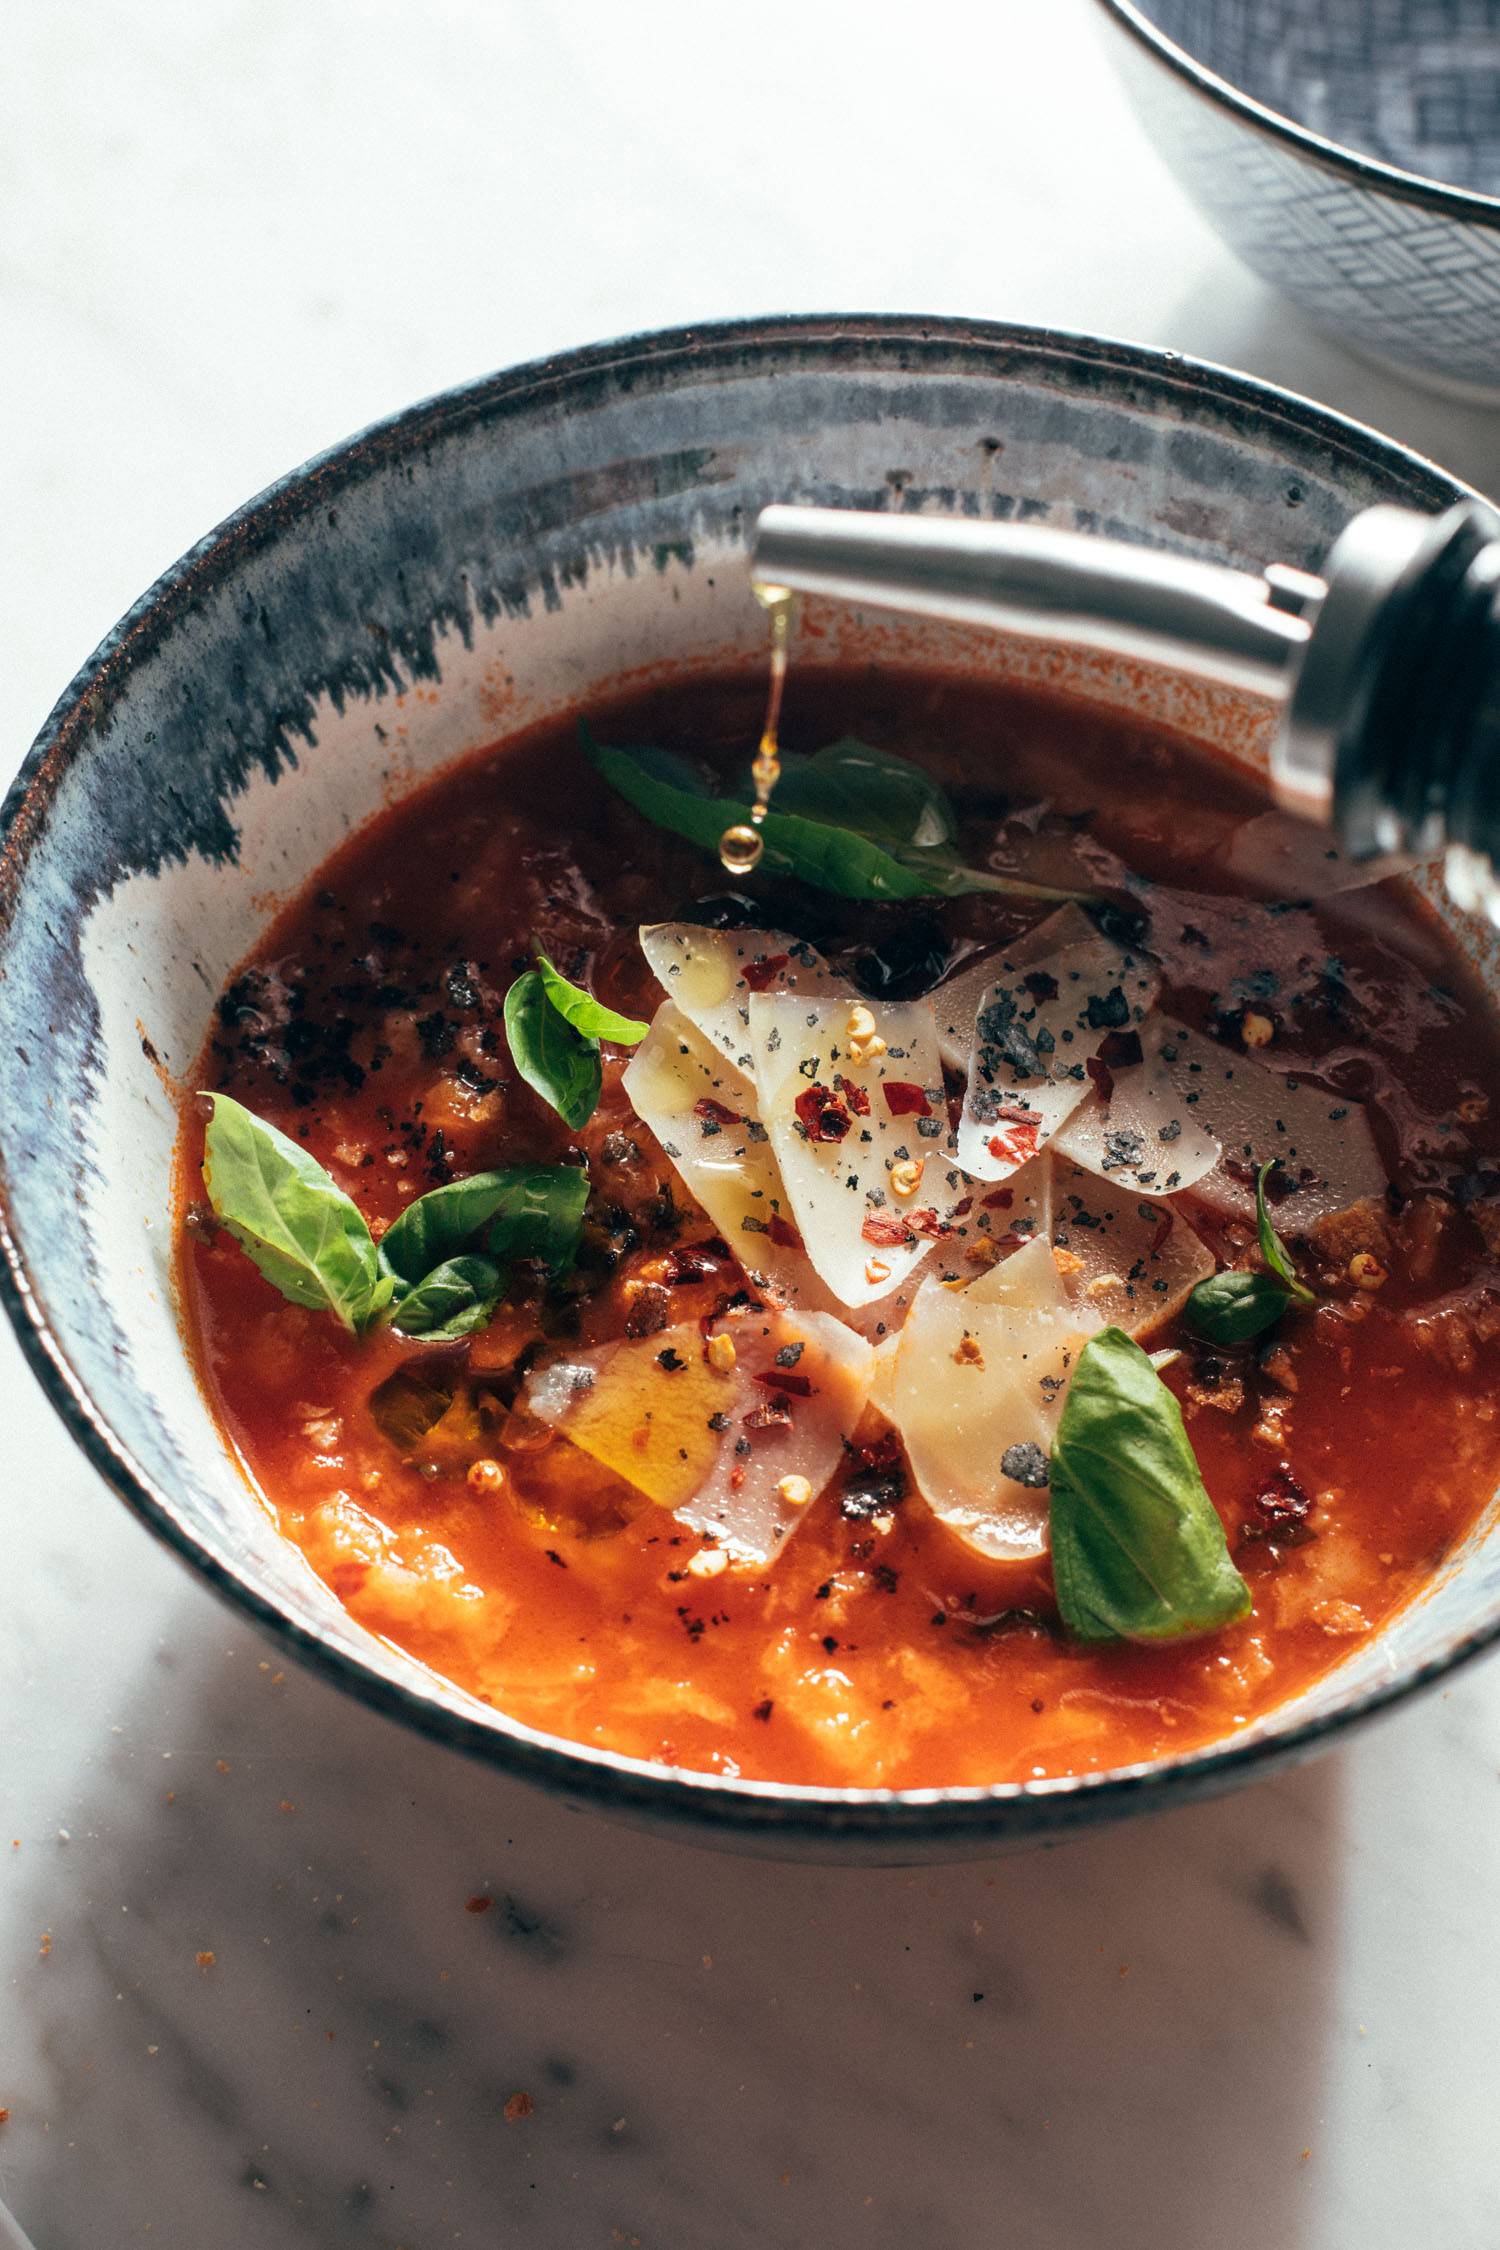
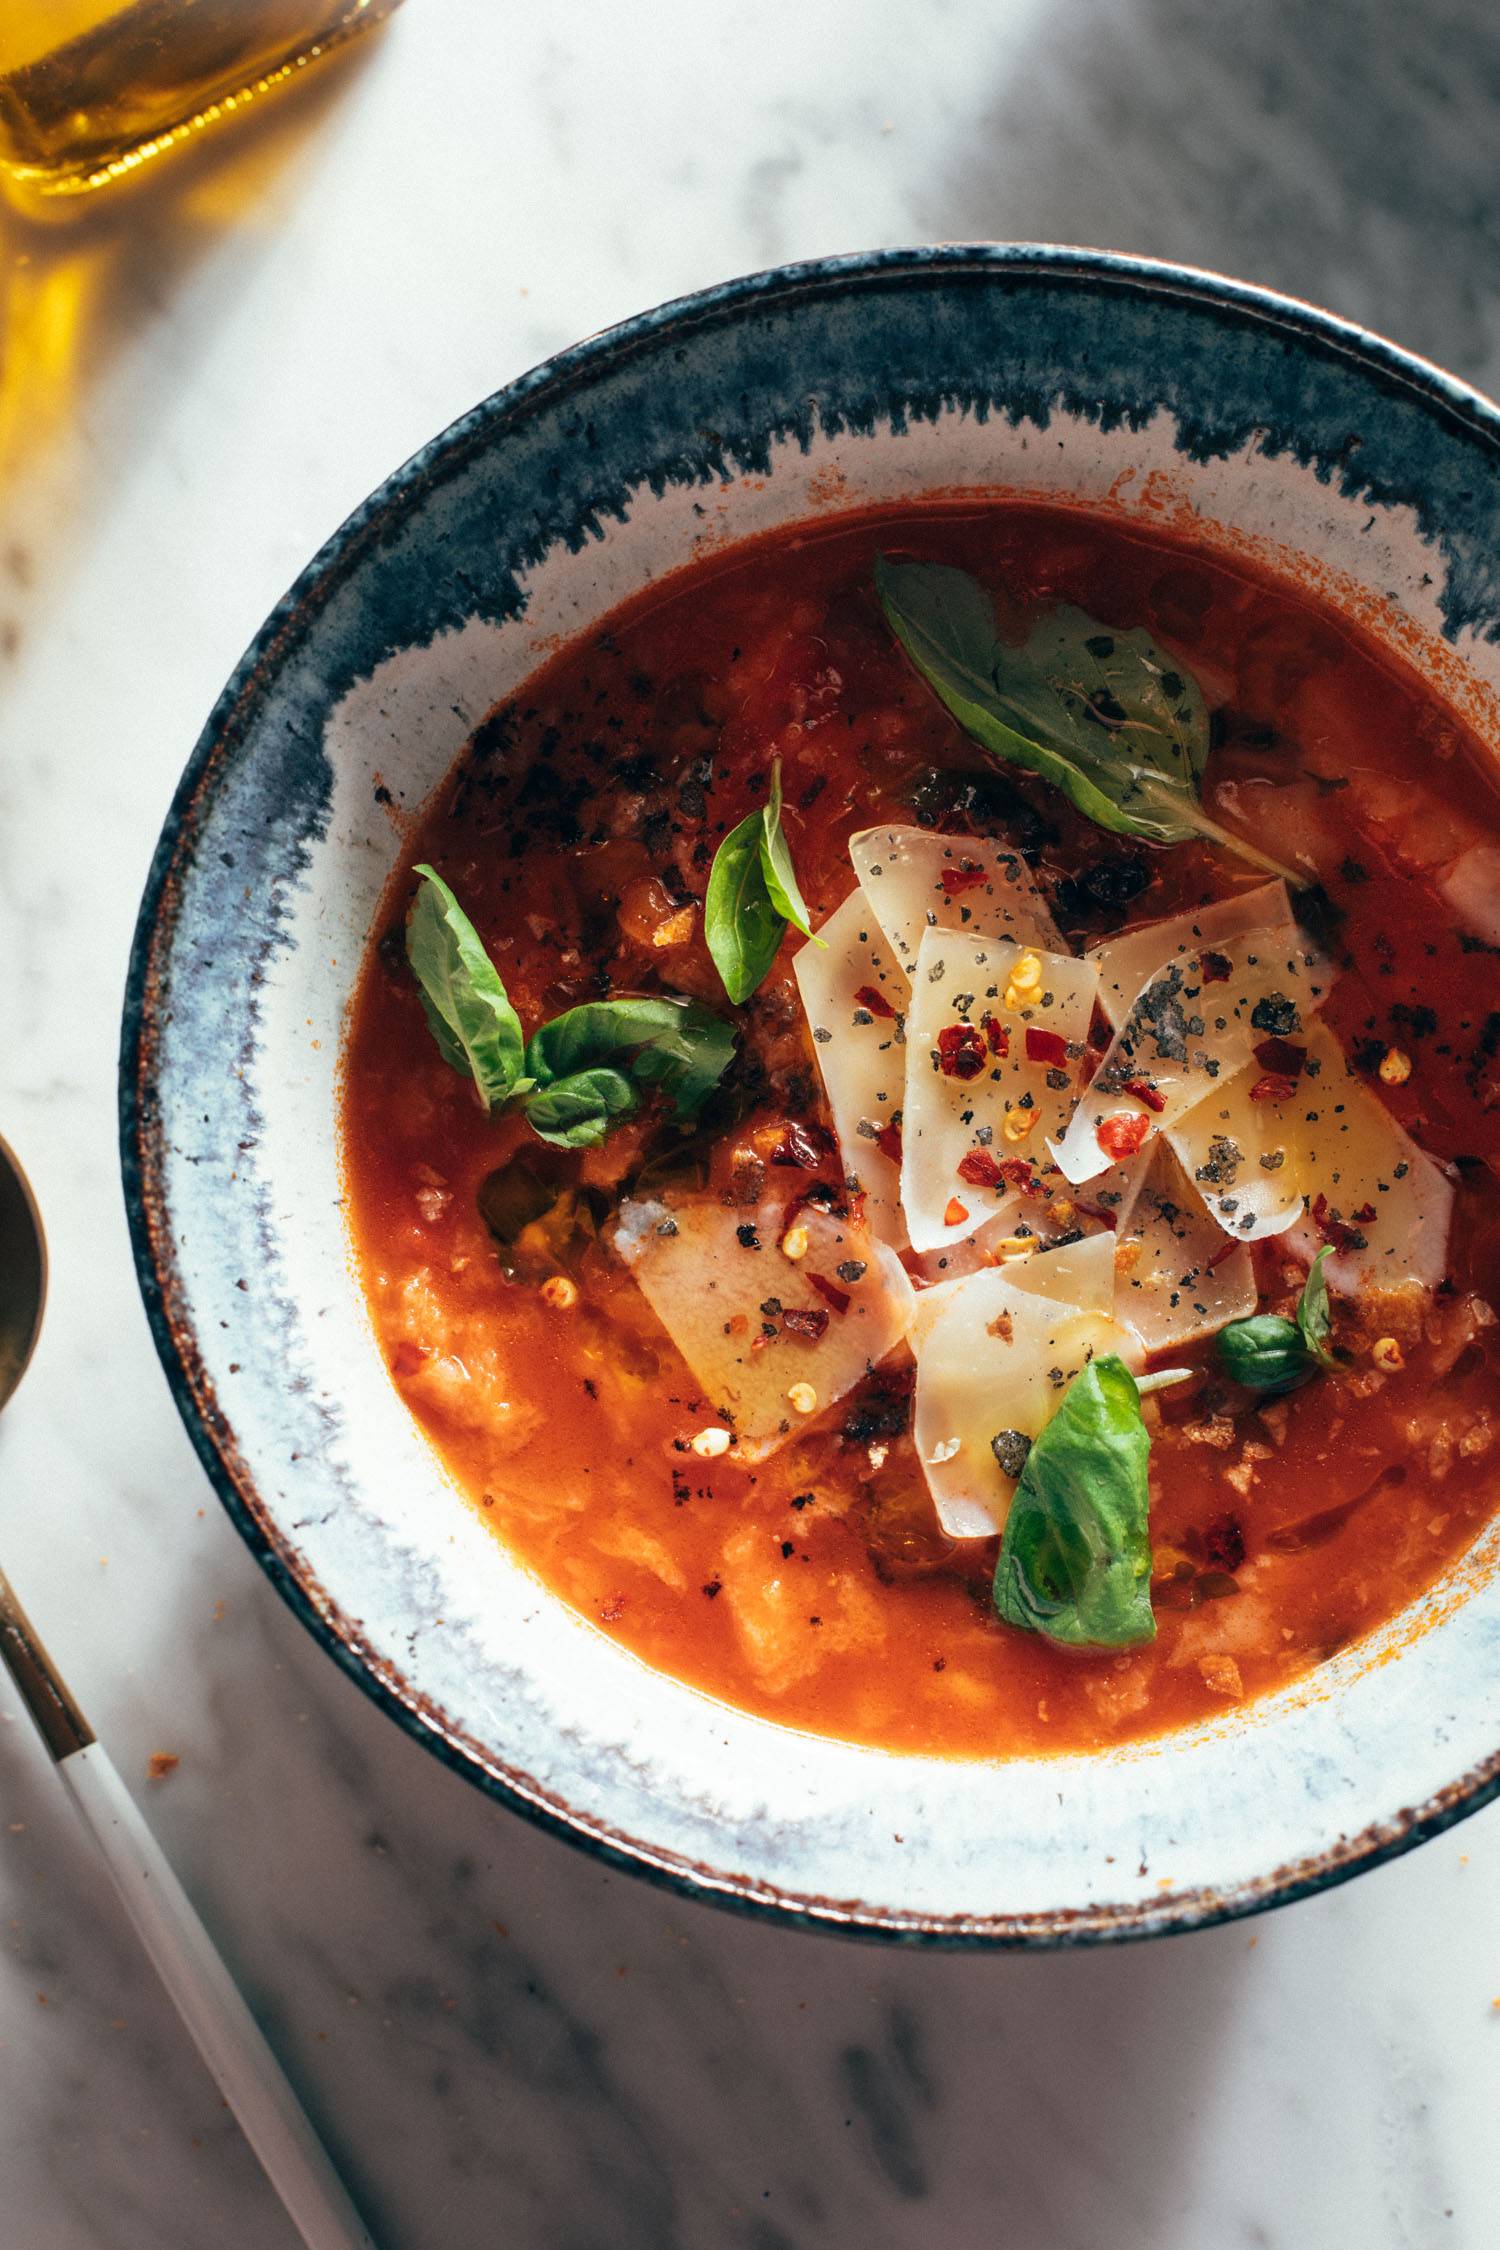
  4. Serve. We served this with extra olive oil drizzles, more fresh basil, and ok also some Parm, yum!

What Kind Of Bread To Use Here

Italian tomato and bread soup is actually born of a time where it was the worst possible crime to let a single bit of bread go to waste (still feels accurate…we ❤️ bread), even if it’s a stale one. So traditionally, it’s made with very stale Tuscan bread, ideally left out for several days. Tuscan bread specifically is made without salt (which dates back to the 12th century when trade lines were cut off to Florence making salt super expensive!) and that meant the bread went stale rather quickly. Thus, this soup, and other delicious things like panzanella salad, was a way to turn stale bread into a dream of a dish.

Traditionalists say a no-salt Tuscan bread is the best here, but that is hard to find outside of Tuscany, so any crusty rustic white bread would do like:

  • ciabatta (we used the rolls, cut up and dried out)
  • boule
  • any country-style bread
  • any other rustic Italian or French bread

Your Bread – The Drier, The Better!

If you haven’t thought ahead and left your bread out (or just happened to forget you had bread and it got stale all on its own! Go you! That’s not an oops, that’s a yay this time!), you can cut up your bread and toast it in the oven to dry it out.

  • Cut bread into slices/cubes or tear it up & spread on a sheet pan
  • 450 degree oven for about 5-7 minutes until it’s dry (not browned), tossing midway

But again, if on a Monday you’re thinking, “Man, I’d love some tomato bread soup on Wednesday”, toss that loaf on the counter, friend, and just absolutely forget about it!

Olive oil being poured into tomato and bread soup

How To Pick Out The Best Tomatoes For Soup

If you find yourself with a glut of sun-ripened summer tomatoes on your hands, THIS IS YOUR MOMENT. All that fresh, unfussed, sweet tomato flavor is exactly what you want for this, so it’s definitely not the time for any hothouse, off-season tomatoes.

If you’re using fresh tomatoes:

  • Roma tomatoes are a great option, but really any super ripe, sweet tomato would do
  • Peel them by scoring with a knife, then giving them a drop in boiling water for a bit, and they should peel easily (tomato skins aren’t really a fun soup texture surprise)

But if you’re like us, you’ll want this soup easy and you’ll want this year-round and luckily you can have it! Thanks to really good canned or jarred tomatoes. Yay for simplicity! That’s how we do.

If you’re using canned tomatoes (like us!), some things to consider:

  • San Marzano tomatoes are tops (very high quality, grown in Italy, lower acidity)
  • whole peeled tomatoes (vs. diced/crushed) are best for optimal taste and texture

Crushing Tomatoes By Hand

Whether you are using fresh or canned, you’re going to want to crush those whole peeled tomatoes BY HAND. Yes, that’s right. Get in there. Not only is it a kind of delightfully squashy sensory experience, it really will give you the best texture. Some chunks of varying size and enough delicate bright red liquid.

When you blend your tomatoes, they turn kind of orangish once the air is buzzed into them so if you want to preserve that hyper-fresh, bright red, perfectly textured, fun-to-squeeze, chunky tomato goodness? Roll your sleeves up, friends, and get at it.

(Sure, you could pop them in a plastic baggie first and squish from there but where’s the fun in that?!)

Variations On This Tomato and Bread Soup

Though you might get a little side-eye from any Tuscan, especially around Florence and Siena, for adding anything but basil, garlic, tomatoes, bread, and olive oil to this soup, there are certainly ways you can play around with it! We added Parmesan to ours and it was delicious.

But if you’re already breaking soup laws, here are some other things to try:

  • hefty shakes of crushed red peppers for spice
  • some diced onion or carrot/onion/celery
  • oregano
  • a dollop of ricotta

Tuscan families could probably fight all day about their pappa recipes. To onion or not to onion, broth or hot water or “how dare you”…the list could go on! The simplicity of this dish and its ingredients is really what makes it shine though, so don’t be shy to let her stand as she is.

Extras To Serve Alongside This Soup

If you’re a rule-follower and don’t want to mess with soup laws, you can keep the soup simple and then just accompany it with some other lovelies like:

You have options! But you also have swizzles upon swizzles of rich olive oil and peppery torn basil and deep tomato flavor that already tastes like bread dips. You really are set.

Beautifully simple, fresh, rich, and delicious. You cannot go wrong with this soup.

Tomato and bread soup in a bowl with fresh basil and parmesan

Italian Tomato and Bread Soup: Frequently Asked Questions

How should I store or serve leftovers of this soup?

This soup will do okay as leftovers in the fridge for 1 day. It can still be eaten, enjoyed, and not too soggy. If you’re sensitive to texture, make the tomato base and add the bread about 10 minutes before serving the soup.

Do you recommend fresh or dried herbs for this soup?

Fresh is the way to go here, if you can find them in the store.

How can I make this soup vegan?

Just use a vegan Parm cheese, if you plan to add that in, and use veggie broth.

Print
Spoon in a bowl of tomato and bread soup

Italian Tomato and Bread Soup


  • Author: Lindsay
  • Total Time: 40 minutes
  • Yield: 4 generous servings

Description

Make way for this Italian Tomato and Bread Soup! Rich flavors of San Marzano tomatoes, fresh basil, thinly sliced garlic, silky olive oil swirls, and bread cubes throughout. 


Ingredients

Units
  • 3 tablespoons extra virgin olive oil
  • 3 cloves garlic, smashed or thinly sliced
  • one 28-ounce can whole peeled San Marzano tomatoes
  • 1 teaspoon kosher salt
  • Freshly ground black pepper to taste
  • 4 cups vegetable or chicken broth
  • 1/4 cup packed fresh basil, chopped or torn
  • 23 cups dry bread, torn or cut into cubes (see notes)

Instructions

  1. Heat the olive oil in a large pot over medium heat. Add the garlic; sauté for 1 minute.
  2. In a separate bowl, crush tomatoes by hand. Add them into the pot. Add salt and pepper. Partially cover and simmer over medium heat for about ten minutes.
  3. Add the broth and basil; bring back to a simmer for another ten minutes.
  4. Add the bread cubes; simmer for another ten minutes until the bread is soft. You can use a potato masher to further break down the bread to your desired texture. 
  5. Serve with Parmesan cheese, extra olive oil, and more fresh basil! Simplicity and top notch ingredients… it’s just stunning.

Notes

For the bread, I’ve been using ciabatta take-and-bake rolls because I so rarely have a loaf of dry bread sitting around! I toast them in the oven until they’re pretty crunchy and dry, and then I pull them apart into small chunks to add to the soup. My rule of thumb is about 1 cup of broth per 1 roll. So 4 rolls = 4 cups broth, 5 rolls = 5 cups broth, etc. Obviously increasing the ratio of bread to broth will make the soup thicker, and vice versa! Make it what you want! ❤️

  • Prep Time: 10 minutes
  • Cook Time: 30 minutes
  • Category: Soup
  • Method: Stovetop
  • Cuisine: Italian-Inspired

Keywords: tomato and bread soup, pappa al pomodoro, italian soup

Recipe Card powered by Tasty Recipes logo

More Fresh Tomato Recipes We Love

The post Italian Tomato and Bread Soup (Pappa Al Pomodoro) appeared first on Pinch of Yum.


from Pinch of Yum https://ift.tt/q8fXTw4

Monday, April 25, 2022

Napa Chicken Salad with Sesame Dressing

Who’s ready for a new current salad obsession? Oh good, us too. In fact, we’re already here. Welcome!

Napa chicken salad in a bowl with a fork

Thinly sliced and ever so slightly sweet and tender-crisp fresh napa cabbage, juicy rotisserie chicken, a super easy homemade sesame dressing, and CRUNCHED UP TO THE MAX with handfuls of cashews, fried wonton strips, dried ramen noodles, crispy fried onions, or sesame sticks…really any delicious cruncher you can find. Or…dare we say…*every* delicious cruncher you can find? We won’t judge.

Live your best super crunchy, super fresh, napa chicken salad life. Super simple and so delicious.

In This Post: Everything You Need For Napa Chicken Salad

Ingredients For This Napa Chicken Salad

The ingredient list overall for this beauty is pretty darn simple, but each thing packs its own flavor and textural punch. The dressing is sweet but with a nice little tang and depth. The salad build is just a chomp-fest and we can’t get enough. Here’s what you’ll need!

All the salad fillers and crunchers:

  • shredded napa cabbage
  • green onions
  • shredded rotisserie chicken
  • cashews
  • fried wonton strips (super easy and our fave, but there other options too!)
  • sesame seeds

Homemade sesame dressing:

  • neutral oil like vegetable (avocado oil is also great if you like that flavor!)
  • a sweetener (granulated sugar, maple syrup, or coconut sugar)
  • rice wine vinegar
  • soy sauce
  • sesame oil
  • salt

You can play around with the dressing flavors to whatever you love best. Switch up the sweetener or scale/omit the sesame oil and rice vinegar, though they’re such a nice varied flavor boost that both are a must around here!

What Is Napa Cabbage and Where To Find It

If you’re not familiar with napa cabbage, it is oblong-shaped and thinner than regular green cabbage and has a more varied texture with tender leafiness as well as crisp parts. It is also slightly sweeter and milder. Napa cabbage is native to China (sometimes also sold as Chinese cabbage) and is a staple ingredient in East Asian cuisine. Super versatile and great for stir-frying, stewing, braising, grilling, and fermenting (yay kimchi!), but also is delicious straight-up raw and thinly sliced like in this salad!

It’s available at most grocery stores, so you shouldn’t have any trouble finding it, but if you get in a pinch, savoy cabbage or white cabbage would be a good substitute.

How To Clean Napa Cabbage

Because Napa cabbage is not as tightly balled-up as regular ol’ green cabbage, you really gotta get between those leaves to shake the dirt out. The preferred method over here is to pull the leaves from the stem, clean them well, and then stack ’em up and patiently slice super thin.

How To Cut Napa Cabbage

If you don’t want to stack the leaves up to slice them super thinly by hand, you could also go the mandoline route. Just slice the head on the cabbage first and then let the shreds soak in water for a bit so the dirt drops (kind of like how you clean leeks) but that one felt a little more awkward since napa cabbage isn’t as firm as regular cabbage.

We also like to mostly use the middle of the head, so you get some of the firmer crunchier white parts and some of the leafier more tender green parts, so we lopped off the bottom core and the floppier tops and went from there!

Let’s Get Cooking

Now that it’s cleaned and cut, get ready for a very pleasing texture party! There’s a little extra step to cut and fry up those wonton strips but you’ll be so thankful you did. And beyond that, thanks to rotisserie chicken and really only a couple items on the chop list, it comes together pretty quickly!

  1. Chop. Use your preferred method to shred the cabbage and chop the green onions and then that little mixture will keep in an airtight container for several days, yay! Shred your rotisserie bird.
  2. Shake. Toss all dressing ingredients in a jar, turn on your fave song, and shake-dance accordingly.
  3. Serve. Toss the cabbage mixture with the chicken, cashews, wontons, and a generous dressing splash. Sprinkle some extra green onion and sesame seeds on top for fun and flavor!
White hand pouring a jar of dressing into a bowl of salad

How To Make Fried Wonton Strips

A word about those homemade wonton strips: just cut wonton wrappers into strips and fry them in a little bit of oil over low heat; drain on paper towels and sprinkle with salt. That’s it! So quick and so worth it!

Fair warning that it is entirely possible you may get ready to toss and serve your salad only to find that you’ve eaten every last one of those crispy, salty, deliciously snackable little fried wonton strips, and whooooops. Luckily, they are very easy to make so you can hop right back on it.

Other Fun Crunchies and Add-Ins For Your Salad

Other add-in options for crunch and yum are crumbled-up dry ramen noodles (yes, those! from the package!), sesame sticks, crispy chow mein noodles, or even those crispy fried onions we know and love.

Want even more green in there? Edamame or avocado would not disappoint. You could also switch up the protein with a little shrimp maybe? Yum. Have at it.

How To Store This Salad

And, as if you needed even more to love about this salad, everything will keep really well for several days in separate containers so it is such a great meal prep option for you to toss up and chomp any day of the week. DREAMBOAT.

Napa cabbage salad in a bowl with a fork and cashews on the side

Napa Chicken Salad: Frequently Asked Questions

What other protein options would work in this salad?

Shrimp would be really, really good! For a vegetarian option, edamame would be perfect!

What’s a neutral oil that you recommend for the dressing?

Vegetable oil is neutral (no flavor), so that works well here. But if you don’t mind the taste of avocado oil, that also works really well here!

What should I do with my leftover dressing?

This makes a huge batch of dressing that will last through at least 10 cups of shredded napa cabbage! Great to keep in the fridge for lunches throughout the week, or toss altogether at once for a big dinner party or potluck-style salad.

Print
Napa chicken salad in a bowl square

Napa Chicken Salad with Sesame Dressing


  • Author: Lindsay
  • Total Time: 20 minutes
  • Yield: 8 generous servings

Description

This Napa Chicken Salad is crunched up to the MAX! Fresh napa cabbage, juicy rotisserie chicken, a super easy homemade sesame dressing, and crunchy handfuls of cashews, fried wonton strips, dried ramen noodles, crispy fried onions, or sesame sticks…the choice is yours! 


Ingredients

Units

Napa Chicken Salad:

  • 1 head of napa cabbage, cleaned, trimmed, and shredded (about 10 cups)
  • 1 bunch of green onions, finely chopped
  • shredded rotisserie chicken (as much as you want)
  • 1 cup of cashews
  • 1 cup of something crunchy – fried wonton strips, crispy fried onions, or crushed-up dry ramen noodles
  • sesame seeds (optional)

Sesame Dressing:

  • 1/2 cup + 2 tablespoons vegetable oil or avocado oil (see FAQs)
  • 1/2 cup maple syrup or granulated sugar
  • 3 tablespoons apple cider vinegar
  • 2 tablespoons soy sauce
  • 2 tablespoons sesame oil (to taste)
  • salt to taste

Instructions

  1. Toss the shredded cabbage with the green onions (and you can keep this mixture in an airtight bowl in the fridge for several days)!
  2. Shake all the dressing ingredients in a jar. 
  3. When you’re ready to serve, toss the cabbage mixture with the chicken, cashews, wontons, and enough dressing to generously coat. Serve with extra green onions and sesame seeds on top!
  • Prep Time: 20 minutes
  • Cook Time: 0 minutes
  • Category: Salad
  • Method: Chop
  • Cuisine: Asian-Inspired

Keywords: napa chicken salad, napa salad, napa cabbage salad

Recipe Card powered by Tasty Recipes logo

More Cabbage Recipes We Love

The post Napa Chicken Salad with Sesame Dressing appeared first on Pinch of Yum.


from Pinch of Yum https://ift.tt/Q5ZP1GW

Monday, April 18, 2022

Garlic Cream Bucatini with Peas and Asparagus

Bucatini pasta in a bowl with a fork and peas
This recipe is sponsored by DeLallo

Listen, we are firm believers that winter doesn’t get to hog all the comfort food, let spring get in on this game! Especially when that food-hug comes in the form of fresh green asparagus bathed in garlic with big bright pops of sweet and springy green peas splashing around in coils of pasta all gently coated in a lush and light lemony garlic cream sauce.

Are there deliciously crunchy and outstandingly savory little golden crispies involved? Absolutely. Is this already wonderful springy win made even better with a fun pasta shape? Yes ma’am, bring on the bucatini!

Ingredients For This Vegetable Bucatini

If you’ve never had bucatini, it’s sort of like macaroni meets spaghetti. All the fun of a macaroni tube but with the long twirls and twists of spaghetti. It’s also got a little more heft to really hang onto your sauce, but it still feels kinda light and twirls with the best of them.

And of course, when we are in the mood for a fun pasta shape, we usually turn to our faves from DeLallo! All of their products are just so high quality and truly elevate all your fave carby dishes. Their pastas are handcrafted in Italy and they are all bronze-cut making the texture just a very A+ partner to your favorite sauces. (But, like, also DeLallo has amazing jarred sauces!) And though you could play around with the pastas in this dish, their bronze-cut bucatini is SUCH A WIN.

So other than your favorite noodle pick, here’s what you’ll need to bring this springtime pasta together:

  • asparagus
  • fresh garlic, grated
  • frozen peas
  • chicken or vegetable broth
  • butter
  • heavy cream
  • lemon
  • some golden crispies (the best toasty breadcrumbs there ever were!)

Are you going to sprinkle some grated parm or maybe some fresh herbs on top just to be a little bit extra? We certainly hope so. Shower it with green, friends. Spring is here.

Overhead shot of pasta, breadcrumbs, and asparagus

Springtime Pasta, Here We Come

No need to spend too much time in the kitchen with this one, we want you to be able to get outside for those brief but increasingly warm temps and get some sunshine on your face, so let’s keep things pretty simple here.

  1. Cook the pasta. Like you do. Oh my, oh my, we hope it’s some bucatini because funnn!
  2. Build your sauce. Melt the butter and toss your asparagus in for a bit, until soft and bright green. Get that garlic in there until fragrant and then in goes the broth and heavy cream.
  3. Simmer and season. Once the sauce thickens a bit, add in the peas for the last few minutes of cooking. Then spring it up with lemon juice + zest, salt, and pepp.
  4. Toss and top! Let everything really thicken up and cling on to that beautiful pasta. Then get your golden crispies raining all over that gem!

The creamy, the crunch, the bright green, the pasta…oof, a lot of wonderful happening here.

Spring bucatini in a pot

There’s Just So Much To Love About This Veg Pasta

Though it is an absolutely lovely little vegetarian queen as is, if you wanna switch things up, you would not be mad about throwing some rotisserie chicken on there or maybe a little sautéed shrimp? Yes, yes yaaaaahm! We’ve tried it and loved it and you will too!

You can also totally play around with your vegetable choices in there. We really loved the sweet green springy combo of the peas and asparagus, but you could for sure empty your fresh produce haul into this for a real pasta primavera sensation.

The sauce is also that perfect balance between rich and light so it really does feel like comfort food with a fresh shine. And if you know us, you know we would cover just about everything in to-die-for golden crispies if we could. If you don’t already have a container of them made and waiting (or if you did but you already ate them like cereal….been known to happen), then you can find out how here or see the recipe notes for a quick cheat version. Yays all around!

If you’re craving spring pasta, and honestly, who isn’t? Please kindly make your way to the kitchen and hop on this one.

Garlic Cream Bucatini with Peas and Asparagus: Frequently Asked Questions

What protein options pair best with pasta?

Shredded rotisserie chicken or sautéed shrimp pair great with this spring pasta!

Will other cuts of pasta work?

Yes! Though bucatini is one our faves here because it’s a bit thicker than spaghetti and it’s just so fun to twirl and twirl and twirl.

Can I make this dairy-free?

You could try using a plant-based butter (or use oil) as well as a coconut cream to keep this dairy-free.

Print
A picture of Garlic Cream Bucatini with Peas and Asparagus

Garlic Cream Bucatini with Peas and Asparagus


  • Author: Lindsay
  • Total Time: 45 minutes
  • Yield: 6 generous servings

Description

This truly is a wonderful springy gem! Bucatini noodles in a garlic-infused creamy sauce and twirled around buttery bits of asparagus and peas. SO GOOD! 


Ingredients

Units
  • 1/2 pound of DeLallo Bucatini Pasta
  • 2 tablespoons butter
  • half a bunch of asparagus, ends trimmed and sliced diagonally (about 1 1/2 cups once cut)
  • 4 cloves garlic, grated
  • 3/4 cup chicken or vegetable broth
  • 1 cup heavy cream
  • half of a bag of frozen peas (about a heaping cup)
  • zest of one lemon
  • lemon juice to taste
  • salt and pepper to taste
  • some golden crispies aka breadcrumbs for topping (see notes for a shortcut)

Instructions

  1. Cook pasta to al dente according to package directions.
  2. Melt butter over medium heat. Add asparagus and cook for 5 minutes, until soft and bright green. (You’ll simmer the asparagus a bit longer in the sauce, so it’s okay if it’s still a little firm.)
  3. Add garlic and sauté for 1-2 minutes, until fragrant. 
  4. Add broth and heavy cream; bring to a low simmer. Once it thickens into more of a sauce, add in the frozen peas for the final few minutes of cooking. Season with the lemon juice, lemon zest, salt, and pepper. 
  5. Toss the sauce with the pasta; keep it all over low heat for a few minutes so the pasta and the sauce really come together. Let stand for a few minutes if necessary for everything to thicken and the sauce to really cling on to the pasta. Top with lots and lots of breadcrumbs, and some rotisserie chicken or sautéed shrimp if you want! So yum!

Notes

Shortcut version of the golden crispies / breadcrumbs: Toast the panko in a skillet with a few tablespoons of olive oil until golden brown. Season with dried Italian seasoning, garlic powder, salt, and pepper. Toss the toasted seasoned panko with crushed store-bought crunchy onions and try not to eat the whole bowl.

Nutrition information does not include golden crispies or any additional protein options suggested, like chicken or shrimp. 

  • Prep Time: 15 minutes
  • Cook Time: 30 minutes
  • Category: Pasta
  • Method: Stovetop
  • Cuisine: Italian-Inspired

Keywords: spring pasta, vegetable pasta, bucatini recipe

Recipe Card powered by Tasty Recipes logo

Thank you to DeLallo for sponsoring this recipe!


More Pastas Swimming In Luscious Cream Sauces

The post Garlic Cream Bucatini with Peas and Asparagus appeared first on Pinch of Yum.


from Pinch of Yum https://ift.tt/qV85mJu